
Looking for quick info on adding a Patrol Work Order? Click Here
If you are having trouble selecting a Location on the Patrol Work Order Add Form, please make sure it's been added to at least one Active Patrol Group before loading the Add Form.
Work Orders can be thought of as Contracts, with all the operational information needed to fulfill obligations therein. Patrol Work Orders describe a model of the patrol services that we're contracted to provide to our Clients. Once the model is defined and saved, as long as you're in operational Date/Time Ranges, Patrols are automatically generated on the Patrolguide Schedule. This alleviates the task of manually scheduling tours each day.
Don't forget to check out Basic List Navigation in Tips & Tricks.
Note: Admins can access Patrol Work Orders by clicking on the Manage menu drop down.

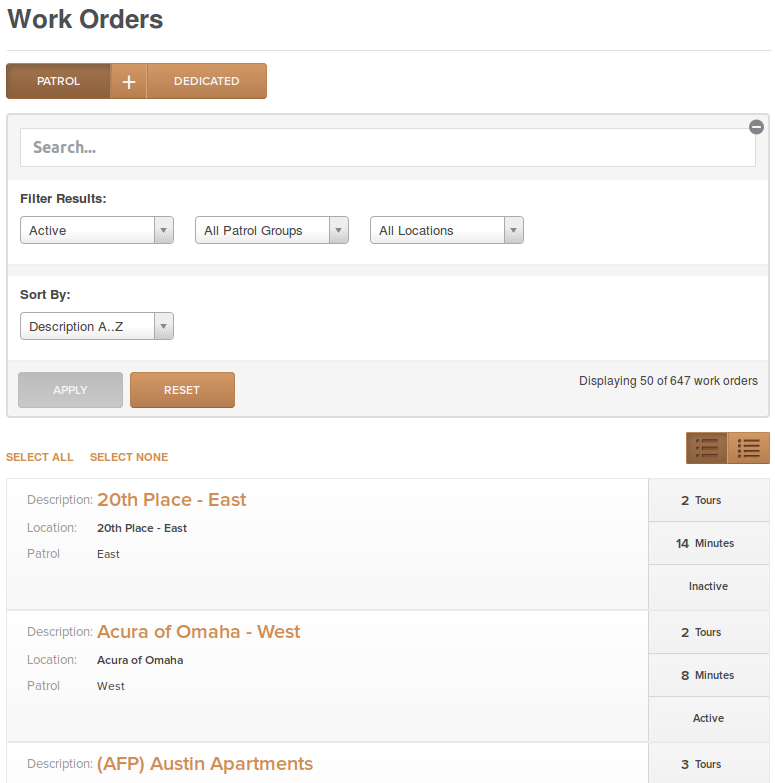
List
Search By
- Description
Filter By
-
Active
- Archived
- Pending (Patrol Work Orders that are set to come on-line in the future)
- All Records
-
All Patrol Groups
- Active Patrol Groups
Sort By
- Description A..Z
- Description Z..A
- Location A..Z
- Location Z..A
- Patrol Group A..Z
- Patrol Group Z..A
- Archive/Unarchive
- Print Detailed
- CSV Export
Print
This prints out the contents of the selected List as seen on the screen.
Detailed Print
This prints out the individual Detail View of each of the selected Work Orders.
CSV Export
This sends a System Message to your Inbox with a CSV attachment of the selected Work Order details. Patrol Work Orders feature Tour Schedules as JSON objects.
Clicking on the List Item link will take you to the Patrol Work Order Details.
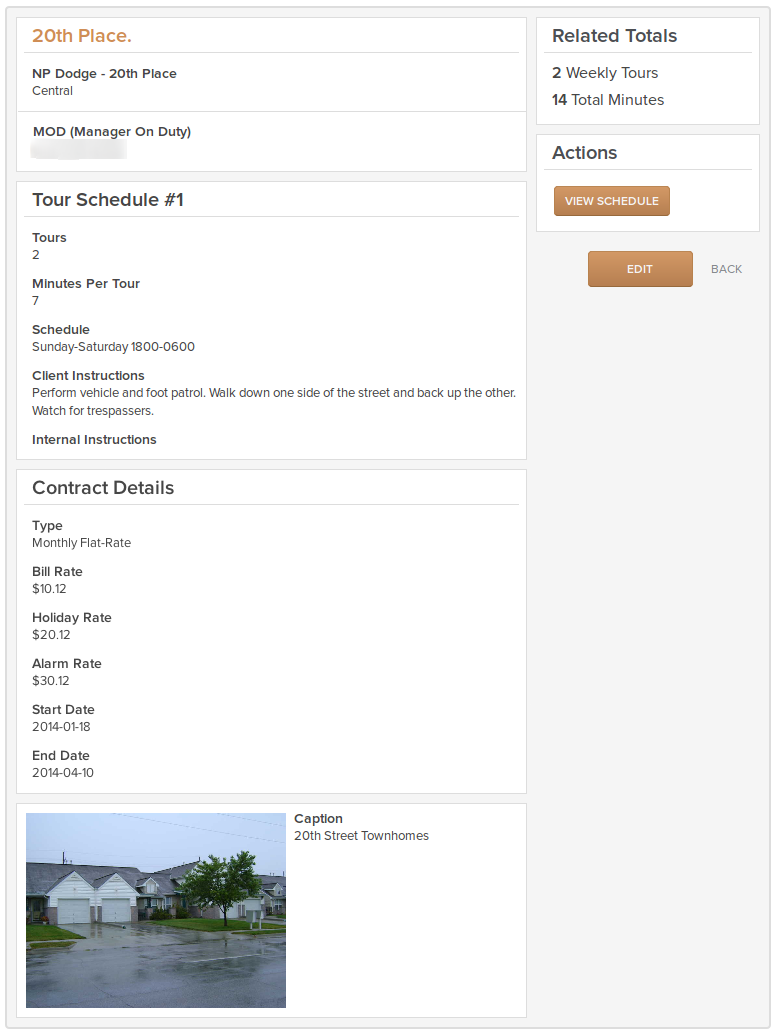
Details
Main Info
Description in Header, followed by Business - Location in sub header. That's followed by the Patrol Group the Location belongs to.
This section is just below the Main Info section, and contains any contact info that Patrol Users might need to fall back on as circumstances dictate. The below example features the MOD (Manager on Duty) Contact.
Days that have uniform or shared attributes are called Tour Schedules. In the example below, you can see that the Tour Schedule calls for 2 Tours every Saturday and Sunday. You could call it a Weekend Tour Schedule. Within each Tour Schedule are Tour Sets. Sets are what are seen on the Patrolguide Schedule on a daily basis. There would be a Set of 2 Tours each for Saturday and Sunday, respectively, in this example.
Contract Details
Listed are the following details:
- Contract Type
- Monthly Flat-Rate
- Per Tour
- Billable Rate
- Holiday Rate
- Alarm Rate
- Contract Duration
- Start Date
- End Date
Premises Pics
This section will display one or many premises pics along with their Titles and/or Captions, if present.
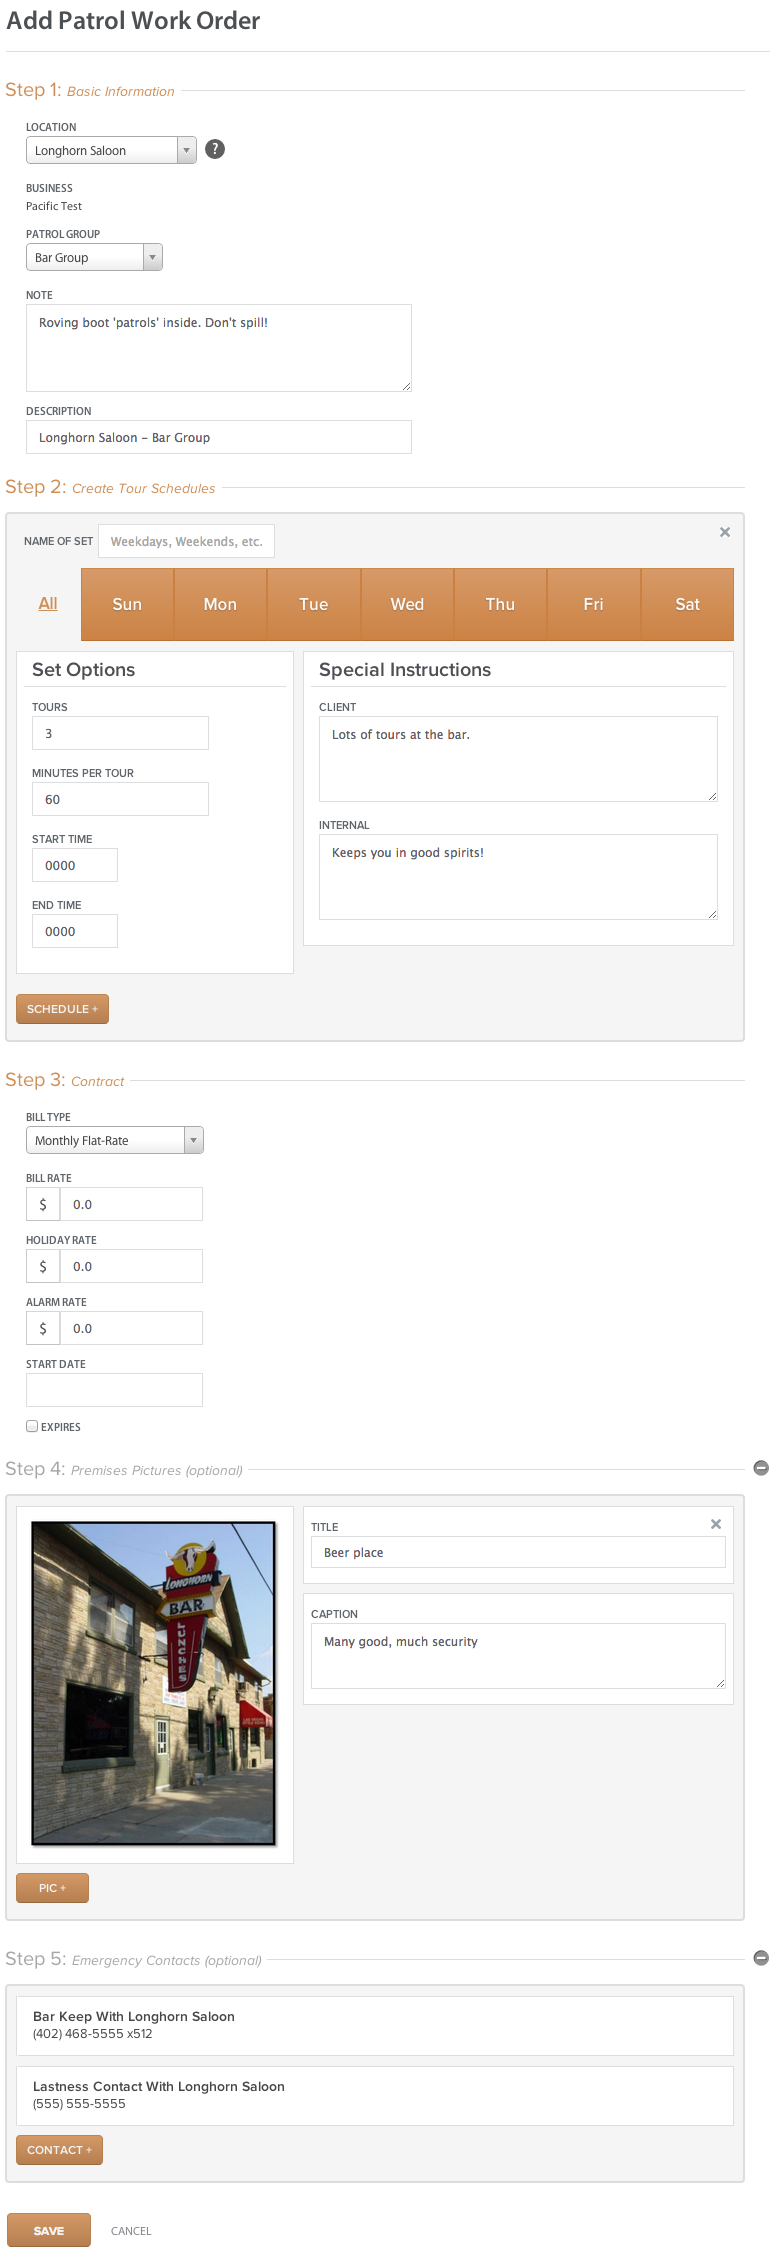
Form
Required Fields
- Location (must belong to an Active Patrol Group)
- Description
- Start Date
We decided to simplify what was required to submit the form. Legacy had tough rules for what comprised a full Tour Model, and, as such, continually tried to correct any errant or missing data upon submission. We made it our mission to reduce the necessary validation and requirements for form submission, while ensuring data and functional integrity, and we feel like we've been very successful at doing so. We achieved that through a combination of innovative UI (User Interface) design, and a more flexible feature set throughout V2.
This is perhaps the only form in the entire system more complex than the Add Shifts Form. For that reason, it's separated into five logically organized steps:
- Basic Info
- Create Tour Schedules
- Contract Info
- Premises Pictures
- Emergency Contacts
Step 1: Basic Info
Select a Location, that will populate the Business and Patrol Group that it belongs to. If the Location belongs to multiple Patrol Groups... you can choose which Patrol Group the Patrol Work Order is being created for. Enter an optional Note, and either modify the auto-generated (and mandatory) Description, or move on to Step 2.
Important Note: You must add any Location you'd like to appear in the Location selector to an Active Patrol Group before it will be featured in the list for selection. If you load the Add Form page and then discover that you've forgotten this step, then please refresh the page if you leave the Add Form open as you add the Location to one of your Active Patrol Groups on another tab or page. This extra necessary step is required to geographically organize the Location into an Active Patrol Group or "Region" (in Legacy parlance) so that Patrolguide knows which Group it belongs to.
These will describe the Tour Schedules (seen above in details. These are NOT required. Just understand that if you add a Patrol Work Order with no Schedule, then the Work Order will only be available for Patrol Alarm Responses & Dispatches.
The Sets have the following attributes:
- Name
- Days (at least one REQUIRED)
- Tours
- Per-Tour Pay Rate (If the Day Rate in Step 3 is left at 0.00, then Billing will look to this value to reconcile the Billing Report for Patrols. Coming soon!)
- Start Time
- End Time (tours worked within this range should occur semi-randomly while spread as evenly as possible. For example: 2 tours in an eight hour range should occur once in the first four hours, and once again in the remaining four hours)
- Client & Internal (meaning, Staff only) Instructions
Everything here is optional except the days. Defaults are 1 tour at 10 minutes within a midnight-to-midnight 24 hour range if the form elements are submitted empty.
In the example below, you can see how the sets are named according to what they are. The first Set describes weekday, followed by weekend Tours in the second Set.
This is the beauty of our new user interface design. It allows you to set whatever attributes you want for each set, and THEN decide what Days those attributes apply to. That's the reverse of how legacy Patrolguide worked. The new design should eliminate much of the duplication that was necessary in the old system.
Note: The days applying to the attributes, instead of the other way around, design feature allows for multiple types of Sets or Tour Schedules, thus eliminating some of the Patrol Work Order duplication needs of the prior system. Admins can, for instance, create a Set for Week Day, Week Night, Week End, Weekend Night, or anywhere between if they so desire; ALL in the same Patrol Work Order! We're excited to be able to bring this higher level of functionality by upgrading an old feature.
Step 3: Contract
The following attributes are fairly straightforward:
- Bill Type
- Monthly Flat-Rate
- Per Shift
- Bill Rate
- Holiday Rate
- Alarm Rate
- Start Date (required)
- Expires Checkbox
- End Date
As the title implies, these are meant to be pictures of the Location Premises, but they can be used for just about anything. Click Pic + and you can add one or many pictures with accompanying optional Titles and/or Captions.
This works a bit differently than legacy Patrolguide. We needed a more useful way to work with Contacts as they related to Locations, so we built a little V2 shim, so-to-speak, to prepare for a full-fledged Contacts system that can be shared between future versions of Salesguide, Inteliguide, Patrolguide, and whatever other product we may introduce based on our Guide technology. Coming soon! That shim actually sees management of Contacts through Locations, now, as opposed to a separate management section within Patrolguide itself. As explained elsewhere, we wanted to remain more consistent and contextual by moving administrative tasks into the Manage section of Inteliguide.
Given that we now have broader use for Contacts in the broader scope of Inteliguide, we wanted to tie that into the Patrol Work Orders. We've done that by bringing in every Active Contact in the system. For that reason, there may be duplicates. But, once selected, you can easily verify the information by expanding the Contact. If it's in error, somehow, simply remove the Contact and add the correct one. We'll be working to de-dupe redundant Contacts going forward with either a background task, or some interface that you can use. Coming soon!
Contacts already Associated with a particular selected Location should auto-populate. If that auto-pop occurs, then this step will be automatically expanded so you can review the selections before submitting the form.
Please see Emergency Contacts in Tips & Tricks for more clarification on how they're differentiated from Authorized Client Users.
Note: Despite this form's complexity, it is far more responsive and intuitive than its legacy counterpart. We're really proud of the optimizations of performance and design we're able to offer you!
0 Comments