
Patrolguide is a module of Inteliguide. We moved the management of Patrolguide into the Manage section of Inteliguide, and moved the Patrolguide Schedule into Inteliguide as well. We reasoned that Inteliguide should handle the Scheduling and Management aspect of its module, Patrolguide. That separation of concerns serves to clarify things and emphasize the true purpose of the module: The Patrol Process
Before diving in further, you might want to check out Patrol Groups, Patrol Work Orders, the Patrolguide Schedule, and Patrol Tours & Alarm Dispatches/Responses to get a more comprehensive understanding of how you would get from square one to here. The process described in this section is really an end result of all the other prior concepts.
The Patrol Process
Given that Patrolling is very much a process, it's useful to describe it in steps:
- Start Patrol with optional Alarm Response
- Choose Location with optional Abort Patrol or Alarm Response
- En Route
- In Progress
- Reporting
- Overflow (conditional last step)
Once Step 5 or, conditionally, if required Step 6 is complete, the whole process starts again until every last Tour is Completed for the Patrol Group you're working; and for all Patrol Groups collectively.
So let's dive right in.
Note: After TONS of feedback requesting that we remove the constant confirmations throughout the Patrol Process, we've finally done that in V2. We've heard from many of you out in the field how much of a pain that extra click is hours into yours and other's Shifts. We know this will save a lot of time, but also it has the potential to create problems. After going to In Progress there still is no backing out. The only way around the Patrol Process is through the rest of it. Please keep that in mind as you use the system and train others to do the same.
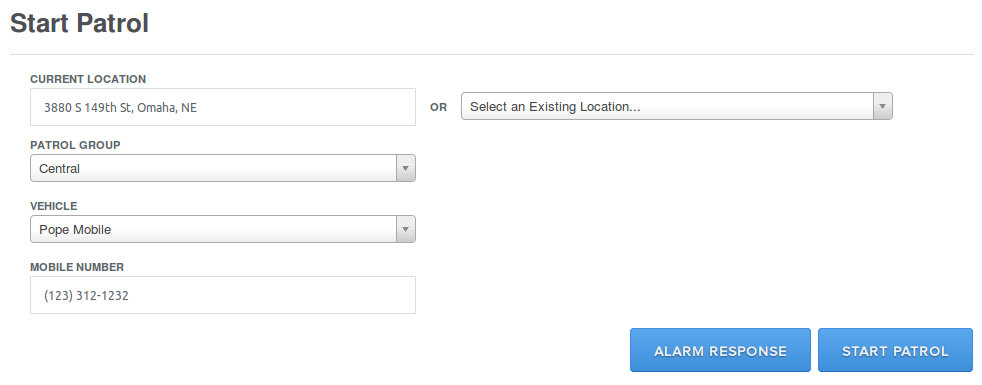
Start Patrol
We decided to simplify and streamline the process of staring a Patrol. We kind of did things backward in legacy where you'd choose the Location you're heading to and THEN enter your Address. We thought that could be more straightforward and now ask Users what their Current Location is before anything else. Like in legacy, you still have the option of choosing from a selection of existing Locations.
Inteliguide will intuitively know when most Users Clock In for their Shift and populate the Patrol Group selection accordingly. If a User has a Mobile Number saved in their User attributes, that will also populate the Mobile Number as well.
The only two things we can't automatically assume from a Clocked In Shift created for a Patrol Group is the User's current Location and the Vehicle they're going to be using. Otherwise, we've already eliminated the need for extra selections and typing. That in addition to combining two input sections into one and eliminating the confirmation to Start Patrol has already saved time and effort.
Either choose to add an Alarm Response or click Start Patrol. That will bring you to the Choose Location Step.
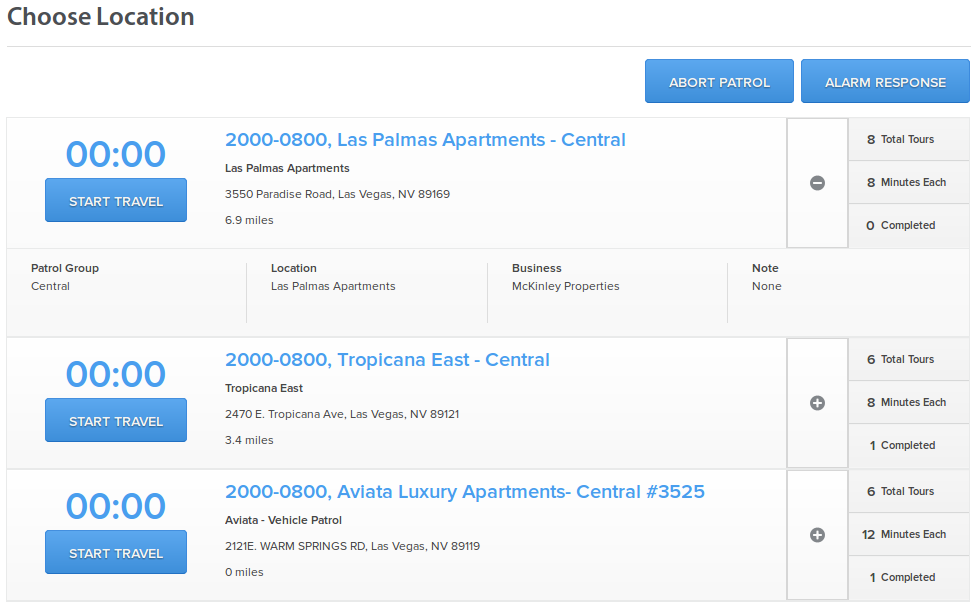
Choose Location
This is the Step where you choose your destination Location.
Here you can see that the List of suggested next Tour Locations to work, generated by our patent pending routing algorithm, resembles the list technology used elsewhere in V2. While it resembles it, it's a lighter weight list that really has a few functions. We wanted to keep it that way for ease of use. There really is a singularity of purpose to the Patrol Process, and that is to keep going, keep moving, keep informed, but, above all, keep patrolling. Anything that's not in the service of that, we felt should be placed elsewhere.
This list will feature the Patrol Work Order Description in the Header, followed by the Address of the associated Location in the sub header. It can be expanded/collapsed to reveal/hide additional details.
It will feature both a Switch Group and an Alarm Response button at the top, and a View More wide button at the bottom of the list. The View More will reveal more available Tours according to the routing algorithm three at a time. These will be the next three best selections, again, as calculated by routing conditions, proximity, etc.
At this Step, you will see your HUD populated with current relevant Patrol Group information:
- Group Total
- Group Completed
- Officer Completed
Hovering or clicking on the down arrow on the right of the HUD will reveal data about any other Users currently working your Patrol Group along with you, including their contact info. We're going to expand that to include a list of all active Users conducting Patrol operations Market-wide. Coming soon!

When you're ready to head to your destination... simply make a selection and click the Start Travel button. You will enter the En Route Step.
Note: A small aside about Alarm Responses. In legacy, Alarm responses were full of input... even if you had already input the required information prior to starting the Alarm response; while starting your Patrol, for example. We now consider your last Current Location to be the Location you'll be traveling from when selecting an Alarm Response Location destination. If you absolutely can't make that work (having gone from your last Location somewhere else, for example, before starting an Alarm response) you can input a NEW Current Location by selecting Switch Group and either typing in a new Address or making a selection from the existing Locations. Both Start Patrol and Choose Locations steps allow you to break out and either Dispatch or create for yourself an Alarm Response. Check out more about Alarm Responses here.
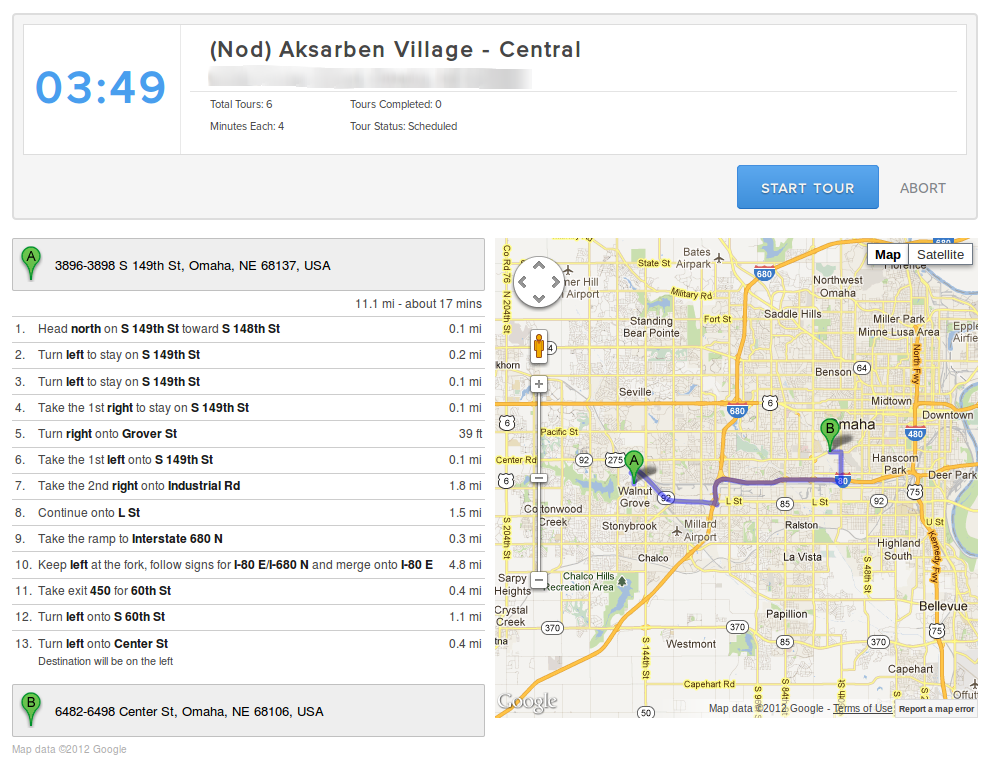
En Route
This, for the time being, has changed little from legacy. We wanted to keep it short and sweet until we were able to integrate turn-by-turn GPS navigation either through mobile or directly into the browser of tablet or hybrid "net book" type devices. Coming soon!
This is the first time you'll see the Main Info Header above the rest of the section user interface (UI). The Patrol Work Order Description comprises the text Header, followed by the Address sub header, like in the previous Step. Following that is specific Tour Set information:
- Total Tours
- Minutes Each (each Tour)
- Completed Tours
- Tour Status
Tour Timer
This is the first time you're introduced to the ticking Tour Timer. This timer serves as a quick reference for how long you've been En Route, In Progress, and even Activity Reporting (during the first Report). It will change to orange the closer it gets to half an hour during this stage, and it will turn Red once it's gone over half an hour. Likewise, the closer the Timer gets to the total minutes each Tour allotment, it will first turn orange and then red once it exceeds that time. Again, this serves as a visual cue to keep Users moving as quickly as possible while still performing all the tasks expected of them.
Navigate to your destination Location and click Start Tour. Aborting the En Route will take you to the previous Step.
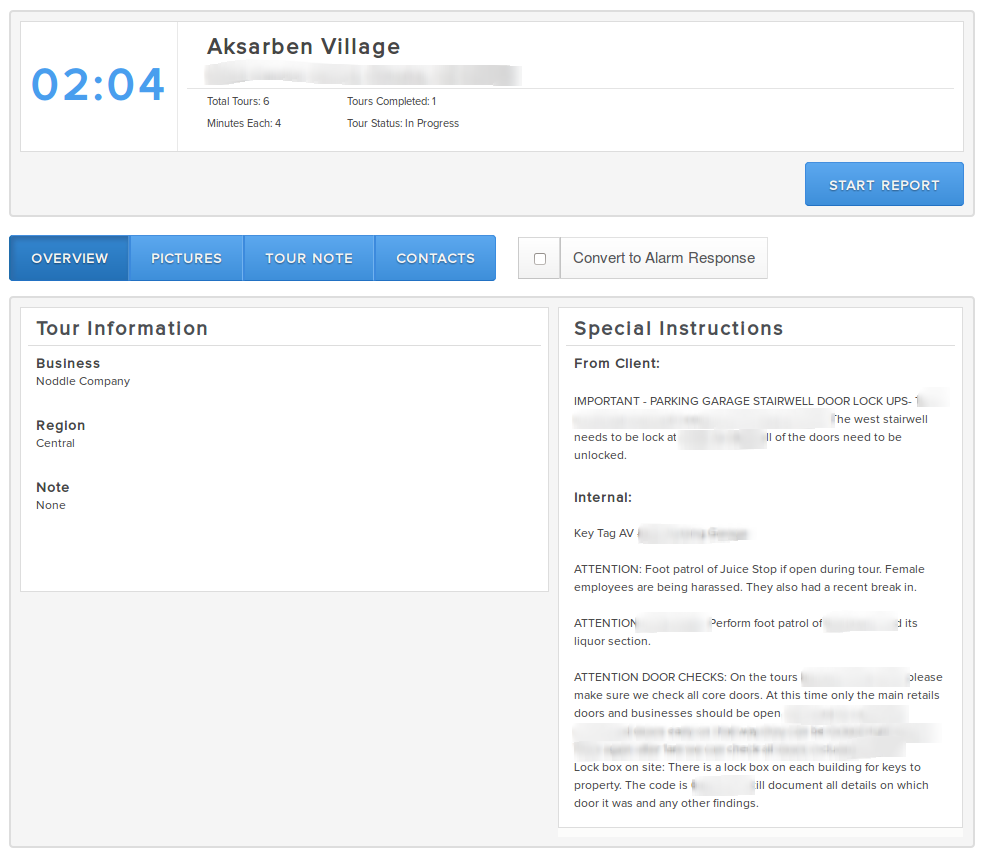
In Progress
Legacy In Progress had a LOT of information coming at you at once while a Tour was In Progress. We wanted to reduce and simplify that, while still allowing you access to the info if you so desired. This Step is comprised of four different discreet sections below the Main Info section.
- Overview
- Premises Pictures
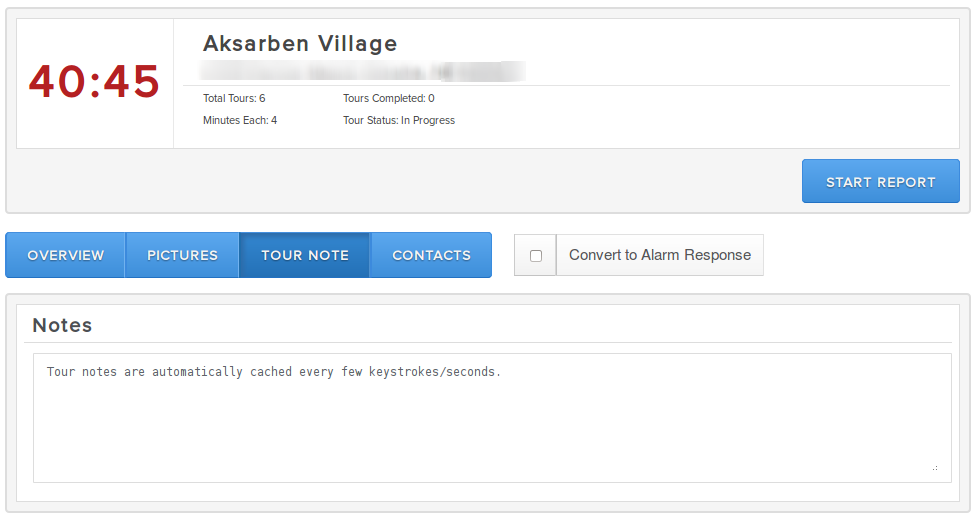
- Tour Note
- Emergency Contacts
Notice the same kind of pillbox navigation that you might see elsewhere in Inteliguide? Regardless of what section you're currently viewing, if you start to type, the section will immediately switch to Tour Note. As mentioned elsewhere, we've also started locally caching Tour Notes that you write every few characters and seconds as you write them.
Apart from the sections we also have made it so you can quickly and easily toggle to and from Normal and Alarm Response. This will eliminate yet one more question and confirmation obstacle.
This section contains basic Tour Information and Special Instructions, both Client and Internal.
Tour Information has the following:
- Business
- Patrol Group (It says Region in the example, but by Beta release we'll be changing that)
- Note
Instructions are ordered:
- Client
- Internal
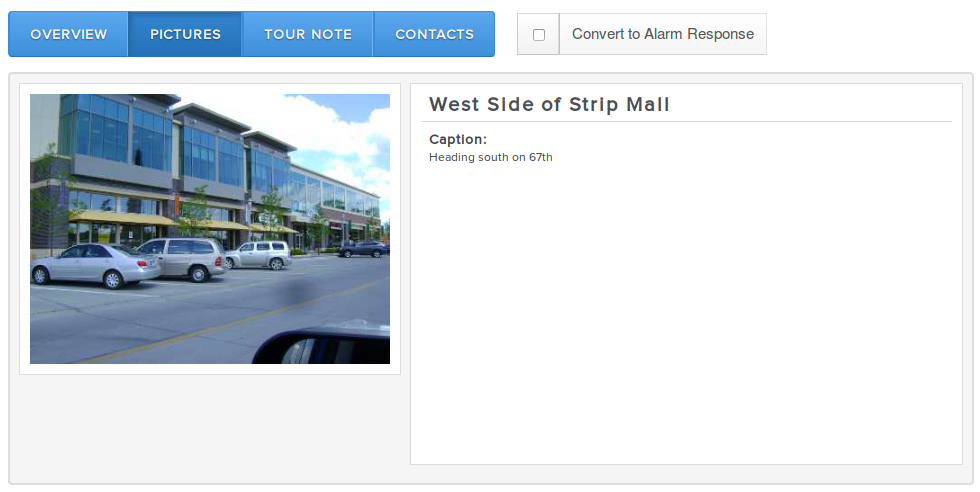
This is a one or many list of Premises Pictures, depending on if any or how many were uploaded and given an optional Title and Caption while building the Patrol Work Order. If the picture is larger than the container, you can easily click on it to view it full size and even zoom in on it in another browser window.
Pictures will be featured to the left, and Titles and Captions to the right. Titles and Captions will only show up if they've been entered, as they are optional fields.
As mentioned above, starting to type any combination of non-special (CTRL, SHIFT, ALT, etc) characters will switch your view from any other discreet section (Overview, Premises Pictures, Emergency Contact) to the Tour Note section so you can easily see what you're typing. This allows you to immediately type without first having to switch to the Tour Note section, thus making taking Notes during your Tour more intuitive than ever!
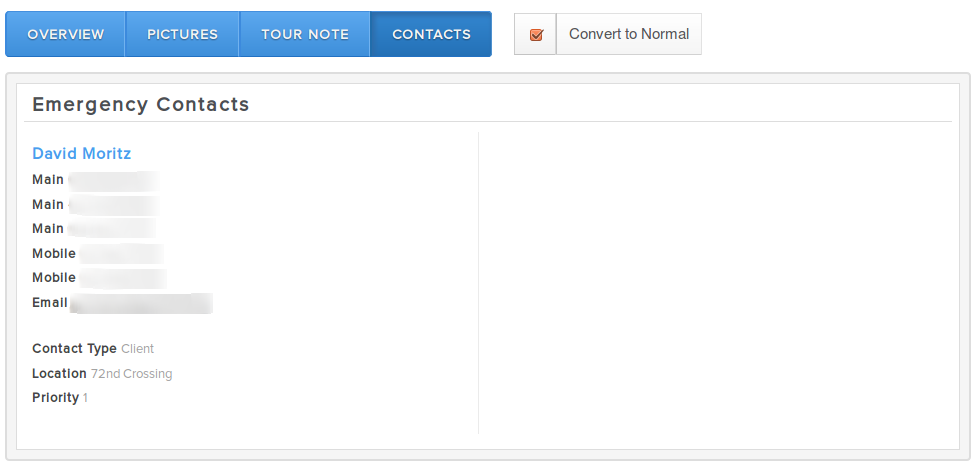
These are one or many Contacts that Admins can associate with Patrol Work Orders. They can be either Internal or External (Client) Contacts. They're listed by Call Order in their fully expanded state, since this entire section is dedicated to the Contacts themselves, and we wanted to eliminate unnecessary clicks requiring expansion and collapsing of UI elements. Again, we wanted to focus on efficiency and streamlining the user interface and user experience.
Note: Notice in the example below how the Convert to Alarm has been checked? It now reflects the opposite state, 'Convert to Normal.'
Reporting
Patrolguide Activity Reporting varies little from Inteliguide. Indeed, they share the same assets and are just styled differently to reflect each respective brand: Inteliguide vs Patrolguide. The defining differences between the two are as follows:
- At least one Report in Patrolguide is mandatory before a Tour is considered Complete. Dedicated Shifts, on the other hand, do not require ANY Activity Reports to be logged before the User is allowed to Clock Out
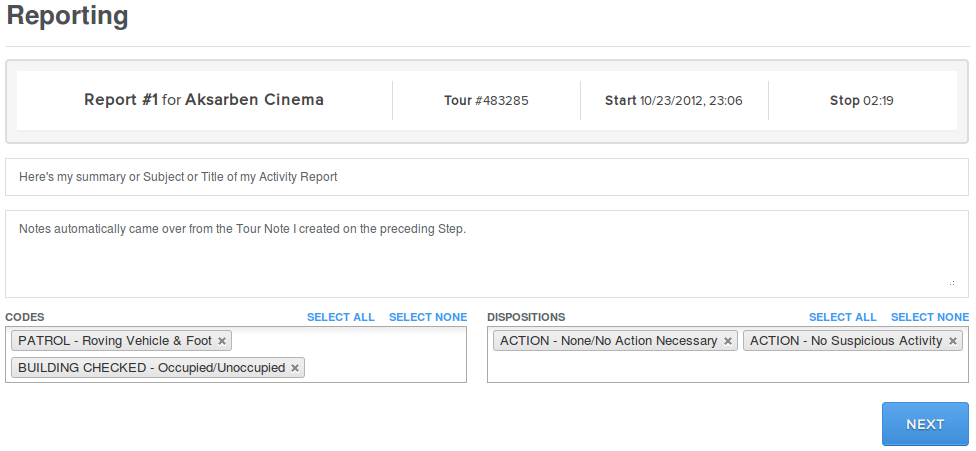
- Since the first Report is included in the estimated time for the Tour, the tour Timer doesn't stop until after the first Report is logged. You can see a smaller version of the Tour Timer off to the right of the Main Info header
- Tours will always have the Location preselected since there is only one Location per Tour at a time
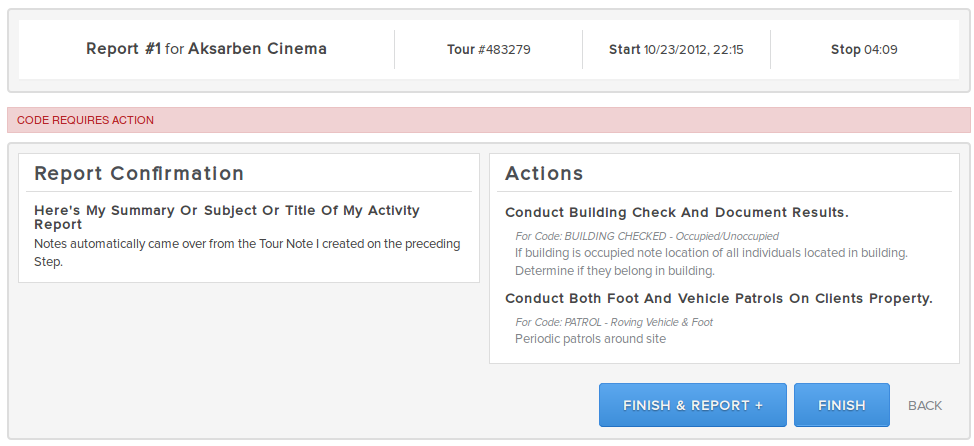
We're very proud of the fact that we eliminated several more steps to the Reporting process compared to legacy. We've condensed the process down from three separate screens to just two, and eliminated the confirmations that used to accompany the old Reports. You can draft your Report and choose relevant Codes & Dispos on ONE page, and review confirmations and required actions on the next.
Instead of asking if you'd like to create another report using a confirmation, as in Legacy, you can now either choose to just Finish or Finish & Report +. The latter will start you over on your next Report for that Tour. A second one is NOT required but is useful in some cases.
Please visit Activity Reports for more details.
Compose Activity Report
Report Confirmation & Finish
That really wraps up the Reporting Step! If you've gone at least doubly over your alloted Minutes Each amount for the current Tour AND there is a Scheduled Tour available to be consumed by the overage, then, as a last step in the process, you will be moved to the Overflow Step.
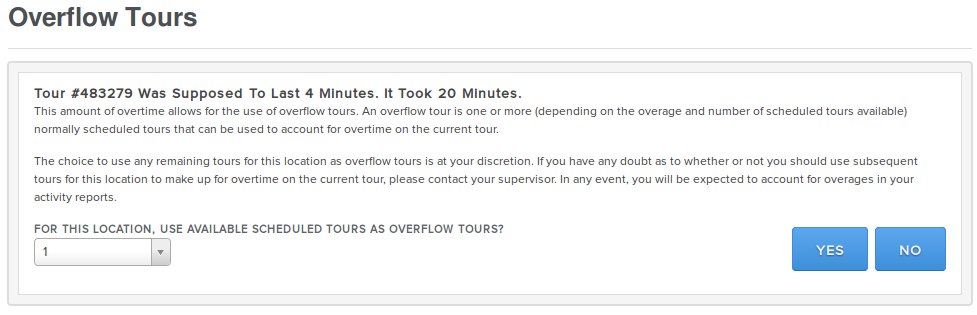
Overflow
This section only comes up if you're way over the amount of minutes you were scheduled to be on Location conducting Tours. As an example, say you're on the first Tour of a Set of three Tours. Each Tour is supposed to last 7 minutes each, but you spend more than 21 minutes on Location. When you click Finish on the previous Reporting Step, you'll be greeted with a choice:
Use one or two tours as overflow? What this means is that you can choose to use one or two of your remaining two Scheduled Tours to cover for an event on Location that may have required your attention above and beyond the allotted time span for your first Tour. This is useful when Law Enforcement is called in, or there has been an Incident such as a noise complaint or domestic disturbance, or any other legitimate reason requiring your services above and beyond what the Client paid for in a single Tour.
You are given a choice because sometimes the delay may not have been caused at the Client Location or by anything to do with the Client at all. Maybe Users were distracted by other Users needing help, or a family emergency, etc. There are many reasons why Users need to be able to choose between using Overflow Tours at all, partially, or wholly.
Start All Over Again
This is where the cycle starts over again at the Choose Location Step. This cycle, in conjunction with our routing algorithm, repeats itself and prioritizes Patrol Routing operations until every last Tour is Completed. It's a dynamic routing system that adjusts to the ever changing demands of Patrol operations both Day and Night. Some Patrol Groups and Markets are too large for one User to complete in one Shift, so multiple Users must be Scheduled accordingly in Inteliguide.
Competing Interests - Customer Satisfaction vs Operational Route Efficiency
We've received a LOT of feedback about our patent pending routing algorithm, and we've listened! We've made plans and started development on vast improvements in routing efficiency, using new and more accurate distance calculations, proximity and "tour due" hard-limited-logarithmic-weighting, driver gravity, location clustering, and additional weighting scenarios such as specific Lock Box and hard timeline operations in combination with the typical "fuzzy" timeline and unpredictable security scenario. Coming soon!
These are just a few things we're doing to combine the competing interests of delivering top notch customer satisfaction while at the same time keeping routing efficiency to a competitive maximum. We're so proud of the work we've done, and so sure of our solution and approach, that we've put together the following video that you can use to share with your Clients.
Enjoy!
0 Comments