
Welcome to the Online Officer Patrolguide Manual
This manual is intended to familiarize you with the Patrolguide web application and how to utilize it to accomplish your patrol tasks. It's designed to be a companion to the Officer Inteliguide Manual.
This resource is broken into the following sections:
- Important Terms
- Login - Resetting Password
- Navigation
- Start Patrol
- Alarm Responses
- Choose Location
- En Route (Travel)
- In Progress
- Activity Reporting
- Overflow Tours
- Heads Up Display (HUD)
- NightEye Dark Theme
- Switching Context
- Application Support Tab
Important Terms
You can read all about the Patrolguide Patrol Process, Patrol Tours & Alarm Dispatches - Responses, and the Patrolguide Schedule, where you'll find a wealth of information and associated references about the organization, generation, and fulfillment of patrol services across Inteliguide & Patrolguide, but this manual is designed to be a relatively self-contained resource for Patrol Officers.
Patrol Officers are defined as Internal employee Users (usually either of the Cop or Civilian Role) created in Inteliguide that have also been given an Officer Role in Patrolguide.
There are a few basic concepts that must be understood in order to fully take advantage of this resource:
- Patrol Groups
- Tours
- Tour Sets
- Patrols
Patrol Groups: These are geographically or functionally related collections of Locations. Admins will organize all the client Locations in the system into one or more groups that can be worked separately by one or more individuals or teams of individuals. They may be named anything, but are typically given geographically relevant names such as North, South, South East, or by neighborhood/borough/city/region.
Tours: A Tour is a single visit to a client Location for the purposes of observing and reporting. Any given patrol shift will have typically many dozens of individual tours that each patrolling officer will be responsible for. Alarm Responses are special tours
Tour Sets: Clients typically purchase more than one Tour per Location for one or more given time periods (days, nights, weekends, etc.). These are also called Tour Schedules, the terms are synonymous.
Patrols: A patrol is a collection of all the Tour Sets for any given Patrol Group.
Tour Status Lifecycle
A Tour goes through several Statuses throughout its lifecycle:
- Scheduled
- En Route
- In Progress
- Reporting
- Completed
The Tour moves from Scheduled and available on the Choose Location screen to En Route as soon as you start traveling toward your selected Tour as a destination.
It then moves from En Route to In Progress and isn't considered Completed until you've gone through and filed your first Activity Report; during which time the Tour is considered to be in the Reporting Status.
Login - Resetting Password
We recommend the latest version of Chrome for the best performance using our web application. If you'd like to use another browser, please check our System Requirements to ensure stable performance.
If you're accessing Patrolguide directly, you'll want to enter your company subdomain into your browser address bar, followed by .patrolguide.com (signal88.patrolguide.com, for example). Don't put 'www' before your company name/abbreviation.

Otherwise, you can log into Inteliguide and simply click/tap the Patrolguide button in the top left corner of the screen. Doing it this way has the added benefit of logging you into Patrolguide, so you don't have to type in your credentials more than once.

Once on the login screen, enter your login Email Address and Password and hit the Enter key or click/tap LOGIN. If you've forgotten your password, please refer to these instructions for Resetting Your Password Through Inteliguide

Navigation
Patrolguide's navigation is very straightforward and mimics the layout of Inteliguide along the top row to preserve the contextual layout between the two applications:

- Top Left: Application navigation, Inteliguide & Patrolguide - click to and from Inteliguide & Patrolguide
- Top Middlish: NightEye Toggle - Toggles dark theme for night patrolling
- Top Right: Message Notifications - Will open messages in Inteliguide
- Top Far Right: Market Context - If you are authorized to access more than one market, you'll be able to choose which one you'd like to patrol while on the Start Patrol screen
Depending on where you're at in the Patrol Process, you'll also see a new element in the above header called the Heads Up Display (HUD).
Start Patrol
Unless you have an active patrol from the night or sometime before, this will be the screen that you'll see immediately after logging in. By this time, you should have logged into Inteliguide and Clocked In to your Shift. That Shift, in many cases - but not all, will reflect the Patrol Group that you should be patrolling.
That should be available for you to select. If it is not, then you may have special instructions from one of your managers on which Patrol Group to select for the night's Patrols.
If you're a Lead Officer, you may actually end up selecting from multiple Patrol Groups to work as you respond to Alarm Responses and cover other areas of need.

Once you've typed/selected a Current Location, selected a Patrol Group, a Vehicle, and entered or verified your Mobile Number, you can click/tap the Alarm Response or Start Patrol buttons to get started!
Alarm Responses
Alarm Responses are special forms of Tours that are more on-demand and, therefore, given special consideration.
There are two ways that you can create an Alarm Response in Patrolguide:
- Immediately work an alarm response
- Dispatch for later or for another officer
Immediately start working an alarm response yourself
One of the most common uses of the Alarm Response feature of Patrolguide is when you've actually received an alarm call from one of your clients or have had an alarm call relayed to you via another Patrol Officer or manager. This is a call that requires some expedited and/or special attention.
Click/tap the Alarm Response button on either the Start Patrol or Choose Location screens to create an Alarm Response.

You can also check the Alarm Response checkbox while In Progress on any otherwise normal Tour to convert it to/from an Alarm. This is useful for when you're already Touring and receive an alarm call for that exact Location. Literal false Alarms can be converted back to a Normal Tour by unchecking the same checkbox.

Dispatch for later or for another officer
Checking the Dispatch checkbox will dispatch the alarm response and leave it to be picked up by virtually anyone working any Patrol Group until the dispatched Alarm is either Completed or Aborted. This can be done by anyone with immediate access to the Start Patrol or Choose Location screens.
If you receive an alarm call for another Location (besides the one you're working) during an active Tour, you'll need to either contact another fellow Patrol Officer, or create it once you're done Reporting at your current Location.
Billable vs Non-billable Alarms
A Non-Billable Alarm will co-opt an existing Tour that's Scheduled for the Location in question that happens to be immediately available. This means that there are no new Tours created, but, rather, an existing Tour is converted to an Alarm Response. Since the Tour has already been paid for by the client, it's considered non-billable.
A Billable Alarm will be created if no such Tour is scheduled and available to be immediately worked at the required Location - either because it's outside the scheduled time requested by the client, or is within the scheduled time but all Tours for the Scheduled Tour Set are already worked. This new Tour is, in most cases, a Billable Alarm Response. That means it's above and beyond what the client is already paying for.
Alarm Response Form

Note: Alarm Responses can also be used to fill in where there are expected Tours that are not showing up for whatever reason. This can happen through schedule errors, miscommunication, or if changes were made by administrators too late in the day to allow additions on the Patrolguide Schedule before the next day. It can also happen if a Tour Set gets stuck in a Status other than Scheduled, or if an expected Tour never got generated. None of these events happen that often, but you should use the SUPPORT tab if you suspect a program error. To make sure that such "filler" Tours are NOT counted as Billable, simply uncheck the Alarm Response checkbox in the In Progress step as you work through them.
Choose Location
Select Tour Locations to work from this screen. It will display a header that says "Choose Next Location" if you're arriving back on this screen round trip from just having completed a Tour.
Search Bar
A search bar will appear if there are so many Tours in the List that the View More button appears. You can use either the Search feature or the View More to search or click through and view all your Tour options for selection.


High Priority - Alarm Dispatches & Expiring Tours
This section will feature one or many Alarm Dispatches and Expiring Tours. These items should be prioritized above any Normal Tours in the List.
Expiring Tours are those Tour Sets that still have yet to be completed and expire in less than 30 minutes. It's a way of saying "hurry up and get to these ASAP!"
Alarm Dispatches are the result of dispatching Alarm Responses by checking the Dispatch checkbox while filling out the Add Alarm Response Form.
Normal Tours
Normal Tours are featured after the Search Bar (if one is present) and the High Priority Tours, and should only be worked if there aren't any available High Priority Tours to be worked first. Normal Tours are ordered according to client needs, Tour Set status, last Location toured, route efficiency, unpredictability, and client satisfaction measures. You can select outside the suggested order, but the system will try and give you the next best Tour selections at the top of the Normal Tours List.
More Info
Expand any of the available Tour Locations by clicking on the '+' icon to view more details. These, along with the HUD - which can keep track of any other fellow Patrol Officers working your same Patrol Group, may help you prioritize either the High Priority or Normal Tours when making your next selection.
Start Travel
Simply click/tap the Start Travel button on the Tour you'd like to travel to (assuming your'e not already there, which can happen sometimes at the end of the night's Patrols or for back-to-back touring) and you'll start En Route to the your next Location!
Take notice of the Alarm Response and Abort Patrol buttons. The Alarm Response button will take you to the Add Alarm Response Form mentioned above, and the Abort Patrol button will take you back to the Start Patrol screen, where you can select another Patrol Group to work (if needed).
Choose Next Location Example

En Route
Use Google Directions to help you navigate to your next Location and start the Tour by clicking/tapping the Start Tour button, or click/tap the Abort link to get back to the Choose Location screen.
Travel Counter and Tour Information
A timer will prominently display and begin ticking as soon as you're en route to your next Tour destination. This is to serve as a reminder of the expediency required while conducting Patrol operations. It will turn red after a half an hour.
Beside this counter you can find Tour Information that reveals the Description and Location Name of the Tour you're working, you can see Address info along with Quantities of Tours required and completed, and finally the expected Minutes Each duration of each Tour along with the Tour's Status.
En Route (Travel) Example

Note: It's important to know that you cannot use the browser navigation buttons during this step. If you try, you could prevent the next Tour from becoming available for you or other fellow Patrol Officers. The system will attempt to correct any native browser navigation by returning you to your last know screen served from the server, but there may be circumstances that prevent that. That can have consequences on the rest of the Tours for that given timeframe.
In Progress
This is where your actual Tour work will take place. You should have arrived on Location and clicked/tapped the Start Tour button on the previous En Route (Travel) screen to start the Tour.
Tour Counter and Tour Information
A timer will prominently display and begin ticking as soon as you start your Tour. This is to serve as a reminder of the expediency required while conducting Patrol operations. It will turn orange halfway through the Minutes Each expected Tour duration, and then red once you've exceeded that duration.
Beside this counter you can find Tour Information that reveals the Description and Location Name of the Tour you're working, you can see Address info along with Quantities of Tours required and completed, and finally the expected Minutes Each duration of each Tour along with the Tour's Status.
Overview Tab
The page defaults to this tab on initial page load. This is where you'll find additional Tour Information that contains the following:
Left Column: Tour Information
- Business Name
- Patrol Group Name
- Note (if any to display)
Right Column: Special Instructions
- Client Instructions (if any to display)
- Internal Instructions (if any to display) - these will be from your management intended for you and other internal staff only

Pictures Tab
Click/tap on the Pictures Tab if available to view pictures of the premises you're Touring on Patrol.
Example

Click the picture to see a larger version of it (if available) in a new tab.
Tour Note
It's your duty to observe and report as much detail as possible within your allotted Tour time. Time is of the essence, but so is critical attention to detail. Observing potential threats, or items of detail that can help prove the value of the security services that you're providing for the client, and for the company you're working for, all in a timely fashion, is of utmost importance. This takes quick thinking and a clear mind.
That's why we've made it so you can start typing anywhere on the In Progress screen and the Tour Note Tab will instantly open with your cursor focused on the Note field. The Note field at this point will have already collected your first characters.
Use the Tour Note to log important details that you might otherwise forget once you're ready to file your Activity Report. This can help you keep the clear and alert mind that you need to do your job to the best of your ability.
Example 
Contacts Tab
Click/tap on the Contacts Tab when available to access any contacts that you might potentially need during patrol operations. They should be listed and clearly labeled as Internal or Client along with a call priority. Please follow procedure and the call order when using these Contacts.
Example 
Convert To/From Alarm
You might notice that all the above example images of the In Progress screen display and Alarm Response checkbox. This can be used to convert the current Tour to/from an Alarm Response directly on the In Progress screen.
Finally, click/tap the Start Report button to start your first Activity Report. Keep in mind that the tour clock does NOT stop running until you've filed at least one Activity Report for any given Tour.
Note: It's important to know that you cannot use the browser navigation buttons during this step. If you try, you could prevent the next Tour from becoming available for you or other fellow Patrol Officers. The system will attempt to correct any native browser navigation by returning you to your last know screen served from the server, but there may be circumstances that prevent that. That can have consequences on the rest of the Tours for that given timeframe. Once you're In Progress, the only way out of working a Tour is through it and through logging at least one Activity Report.
Activity Reporting
This screen is where you formalize your thoughts and observations gathered throughout your Tour activities, collect your Tour Note from the In Progress screen, select your Report Category, Codes/Dispos, and click the Next button to confirm and file your required Activity Report.
Report Categories are Activity, Flagged, Maintenance, and Incident.
- Activities are your typical, "all clear, nothing important to report but I delivered excellent security value" reports. It's "nothing to see here" but also a unique message to the client. It's important to not only provide, but also prove the deterrent effect that clients are paying for. These, hopefully, will be most of the Reports that you file.
- Flagged are elevated Activities deserving of some additional attention. This can be as simple as a compliment paid by a tenant or client about the quality of service you're providing, or as complex as something that requires the client's attention. Flagged Activities don't quite qualify as Maintenance or security Incidents in nature, and can serve as a catchall for when those other two or just a regular Activity isn't appropriate. A good example would be a tenant loading a large truck that partially blocks the sidewalk/parking/drive, and a propped open secured access point. This isn't really maintenance, or a crime, it's just something to note as that could be used in conjunction with piecing together a potential related Incident event; perhaps the propped open door allowed access to a restricted individual in the same building that later led to an actual incident, for example. Any Flagged Reports will need to be justified with a quick note on why they're being flagged. This is to clarify the intent of singling the report out, as the intent is not otherwise as apparent as with Maintenance or Incident Reports.
- Maintenance are very clear and tied directly to maintenance requests or observations. Lighting assessments conducted or needed. Overflowing trash bins. Building/hallway lights out. Broken access points, locks, gates, concrete, or even median grass and weeds that are so overgrown that they obscure the view for people navigating to and from roads, driveways, and parking lots. Those are just a few of myriad examples.
- Incidents are clear security breaches, threats, disturbances, and crimes. These could and should also qualify for lesser security incidents, like parking violations, ban & bar, and confrontations due to loitering or any other kind of mischief. They hopefully will only constitute a small percentage of the Reports you file.
Report Codes/Dispositions are many related "tags" that are required to accompany your report. They may be general in describing the work you did while Touring (Roving Foot/Vehicle Patrol), or very specific in how you reacted to an incident or request that you encountered onsite (Gas Leak… Called Utilities, for example). The Codes/Dispos you select often come with instructions on what to do next. Some markets have highly specialized Codes/Dispos according to their job sites, but the collection of possible Codes/Dispos that you have available to you for any given Location can be decided by your management. So if you often find yourself in need of a particular Code or Disposition, you can request that your management add new ones to their overall list or to the Locations where they're needed.
Your Tour Clock is Ticking
The Tour clock will still run, as seen on the upper righthand side of the Report form for your first Activity Report. It's important to know this and factor it into the time allotted to you for any given Location/Tour.
Make sure to enter a Summary of your Tour activities and better format any Tour Notes that might need it. Add additional information and be as detailed as possible about circumstances, events, people, places, and items of interest involved in your observations.
Form Example

Confirmation Example
Your selected Codes may generate actions that require some type of communication and/or action. Please be sure to review this section before continuing on to finish the Report.
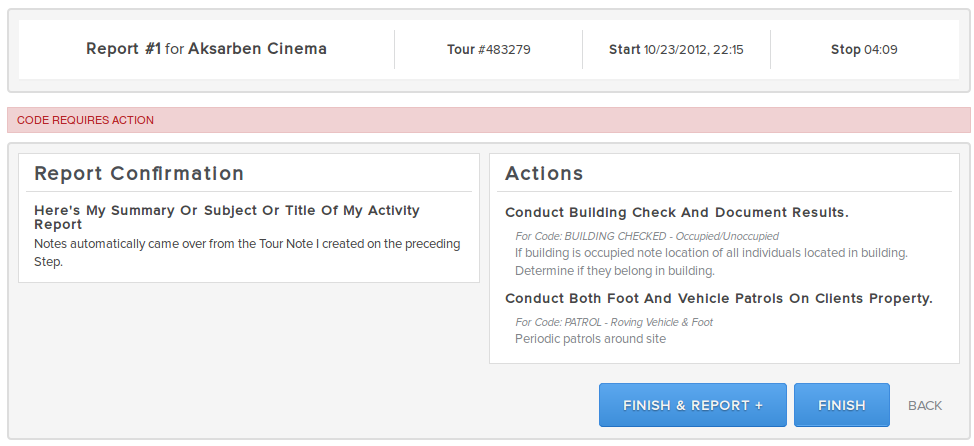
Wrapping Up
You're truly responsible for at least one Activity Report per Tour. You can, however, optionally file more than one if the need arises. Say, for example, you need to file an Incident Report but also noticed that there were some Maintenance issues that you discovered as well. Creating one report for the Incident and another for the Maintenance is the recommended course of action in that case.
Click/tap Finish & Report + to log another Activity Report or click/tap the Finish button to proceed back to the Choose Next Location screen to start another Tour.
Note: The Tour Clock stops running on the current Tour after the first Report is logged, but please be cognizant of the amount of time you're spending between Tours while you file additional Reports… as this may affect the overall performance for your Patrol.
Note: It's important to know that you cannot use the browser navigation buttons during this step. If you try, you could prevent the next Tour from becoming available for you or other fellow Patrol Officers. The system will attempt to correct any native browser navigation by returning you to your last know screen served from the server, but there may be circumstances that prevent that. That can have consequences on the rest of the Tours for that given timeframe.
Overflow Tours
If you happen to exceed the expected Minutes Each by double or more the expected duration, then you may choose to use any available Scheduled Tours for that Tour Set as Overflow Tours. This simply means that any available Tours in the given timeframe will be consumed and added to the Tour you just wrapped up. This is due to the extra time that Tour took to complete above and beyond the scheduled duration.
It's at your discretion whether you think it's wise to use additional Scheduled Tours as Overflow Tours due to whatever circumstances that caused the delay. It is NOT acceptable to use Overflow Tours due to a personal interruption.
Overflow Form Example
You can see in the below example that the Tour was supposed to take 10 minutes, but instead took over 80 minutes. That means that the additional 4 Scheduled Tours could be used as Overflow Tours. That would consume all 5 originally Scheduled Tours for that Tour Set into one very long Tour. This, of course, wouldn't be advisable if the circumstances didn't dictate.

Simply select the amount of Tours you'd like to use and click/tap the Yes button to convert them to Overflow Tours. Or click/tap the No button to continue without converting any Tours to Overflow Tours. Either action will bring you back to the Choose Next Location screen.
Heads Up Display (HUD)
The HUD appears when you've selected a Patrol Group to work on the Start Patrol screen and started a Patrol. Patrolguide uses this Patrol Group to tell you details about the totals of Tours expected, Tours completed, and Tours completed by you, along with details about any other fellow Patrol Officer that might be simultaneously working the Patrol Group along with you.
The totals are calculated over a 24 hour period from 0800-0800.
HUD Example

NightEye
The NightEye Dark Theme is available for when you're conducting night Patrols. It reduces glare from a backlit LCD/LED displaying a white background, and helps preserve critical night vision.
Simply click/tap the icon of the eye at the top of the page to toggle NightEye on/off.
NightEye Example

Switching Context
If you're a member of multiple markets and authorized for more than one of them as a Patrol Officer, then sometimes you may need to jump from working one market into working another. This can only be achieved by Aborting the current Patrol in one market and then selecting the next market on the Start Patrol screen.
You can do this through the Context Menu at the top right of your screen.
Switching Contexts Eample

While Patrolling
You'll notice that you don't have access to the same options during patrol operations. This is because patrols can only take place in one market at a time, and even if you're not actively working a Tour… you're still working a Patrol Group that belongs to only one market. This is true even if you're on the Choose Location screen and it's coming up empty because there are no available Tours to be worked at that time.

Application Support Tab
Click/tap the SUPPORT tab on the right of the screen to get support using the Patrolguide application. This feature is not for asking security or management related questions. It is for getting help using the web or mobile applications. The tab will retain a fixed position as you scroll down any screen. The corresponding dialog will allow you to search through available documentation (if you're logged into our support portal in Zendesk, it grants even more access to password restricted documentation) as well as log a new ticket if necessary.

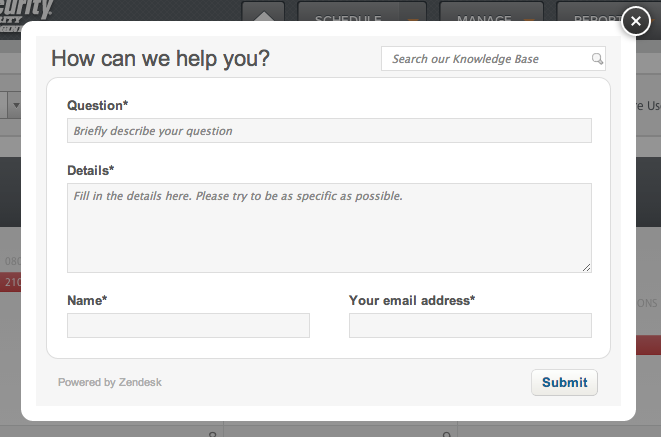
If, for some reason, the dialog isn't working for you. You can navigate your browser to https://lyconic.zendesk.com and access our full support website. Browse available posts, or submit a support ticket from our support website.
If you do decide to log a ticket, please be as thorough as you can be in explaining the details of the issue you're logging the ticket for. Describe in detail what your question/issue is about, and what events might have prompted you to submit a support ticket.
Note: Using the Support tab in both Inteliguide & Patrolguide on the page you may be having difficulties with gives us access to the URL that may have been part of the problem. This is very useful for us in determining what might have gone wrong.
0 Comments