
Welcome to the Online Officer Inteliguide Manual
Looking for the Officer Patrolguide Manual?
This manual is intended to familiarize you with the web application and how to utilize it to accomplish your various work tasks and duties.
This resource is broken into the following sections:
- Login - Resetting Password
- Navigation
- Your Dashboard (Home)
- Your Profile & Settings
- Your Inbox
- Shifts, Schedule, & Agenda
- Shift Details
- Documents
- Committing to Shifts
- Working Shifts
- Time Punching & Payroll Info
- Logging, Viewing, & Editing Activity Reports
- Application Support Tab
Login - Resetting Password
We recommend the latest version of Chrome for the best performance using our web application. If you'd like to use another browser, please check our System Requirements to ensure stable performance.
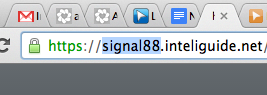
You'll want to enter your company subdomain into your browser address bar, followed by .inteliguide.net (signal88.inteliguide.net, for example). Don't put 'www' before your company name/abbreviation.
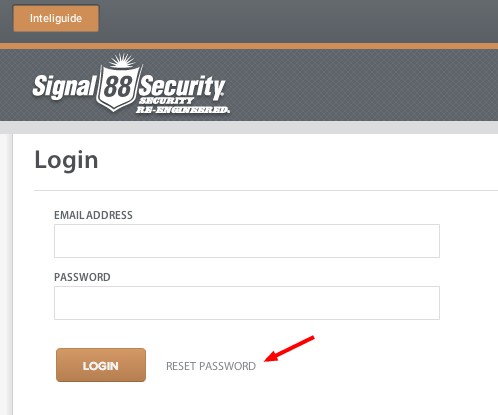
Once on the login screen, enter your login Email Address and Password and hit the Enter key or click/tap LOGIN. If you've forgotten your password, please refer to these instructions for Resetting Your Password.
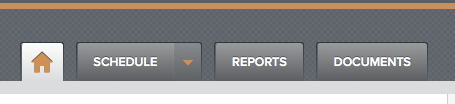
Navigation

Above the orange horizontal line is the context bar in three sections (listed from left to right)
- App Navigation
- Notifications
- Profile Info & Context
Below the orange line is the Main Navigation.
App Navigation
These buttons will switch the view to either Inteliguide or Patrolguide all using a single sign on solution. Login to one, and immediately access any that your account is authorized for.
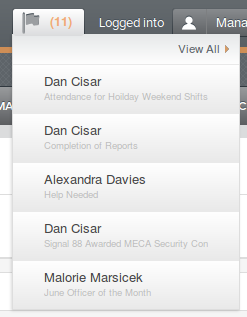
Any new system notifications, generated files, or internal messages will first appear here ordered by unread first. Clicking/tapping "View All" leads to Your Inbox.
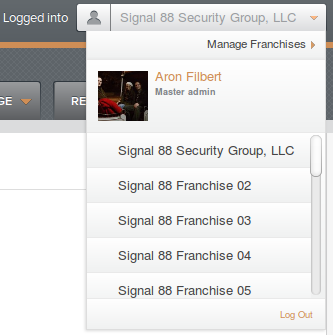
This is where you will find out basic profile info and can choose which Franchise Context to work in depending on if you are Authorized for more than one Franchise.
The area between the orange horizontal line and the gray horizontal line contains the main navigation for the app. This may vary depending on your Role.
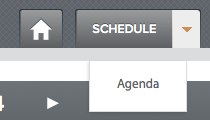
Hover over the Schedule Tab to see a link to your Agenda.
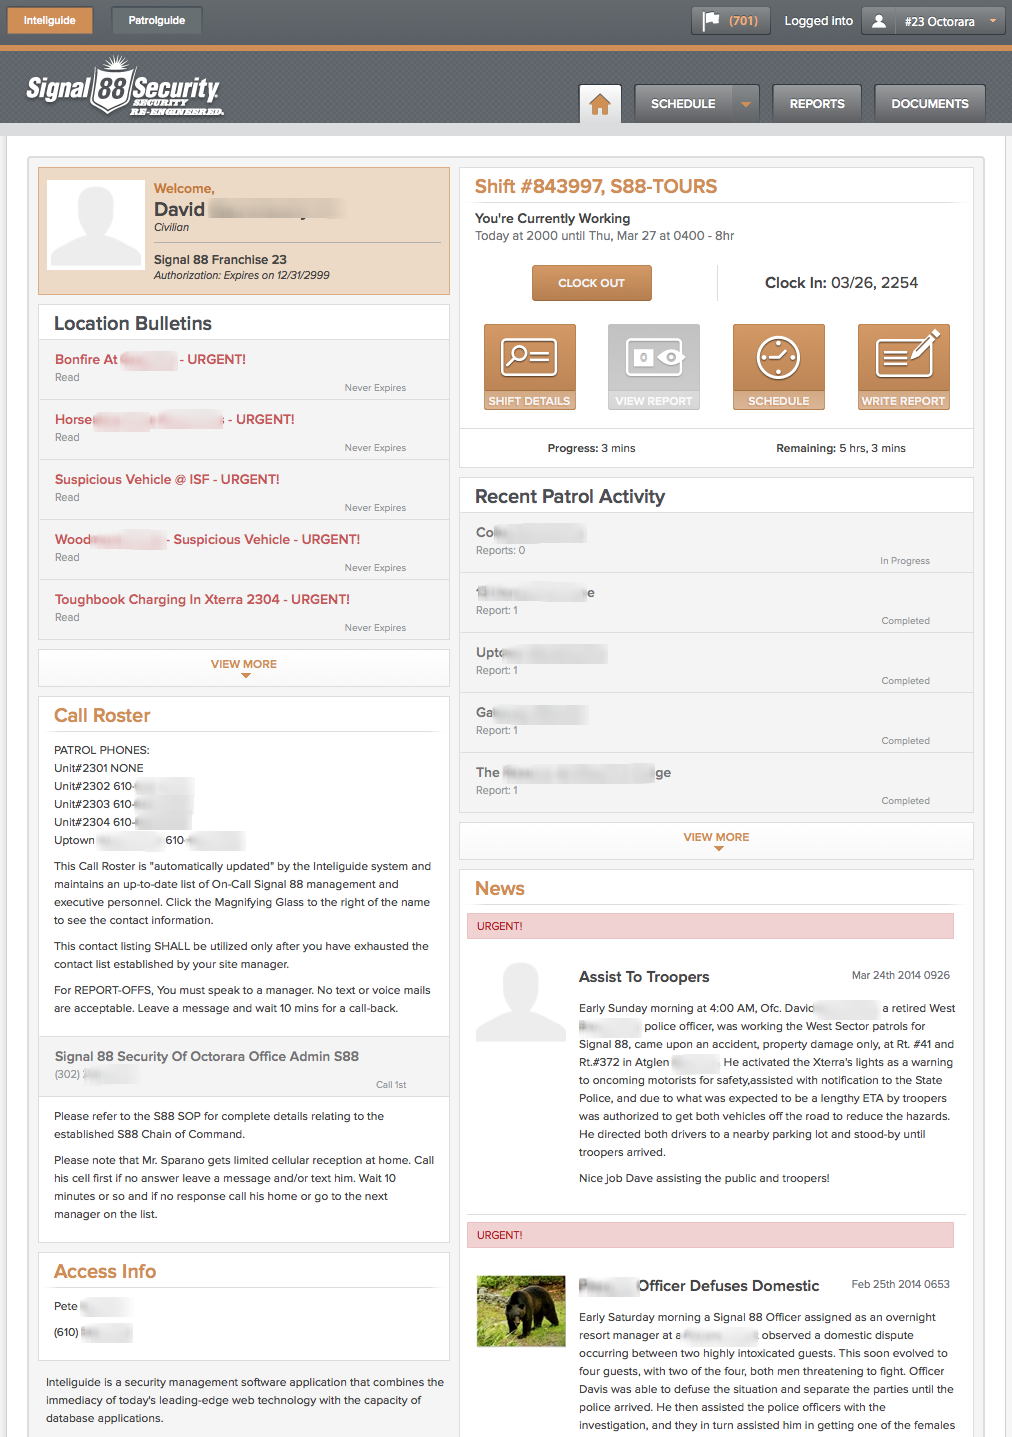
Your Dashboard (Home)
This is the first screen you see after logging in. It's divided into widgets that serve various functions. You may or may not see some of these widgets depending on settings.
Widgets:
- Profile Info
- Shift Dash Widget
- Location Bulletins
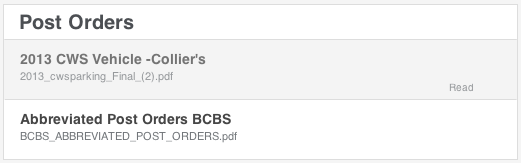
- Post Orders
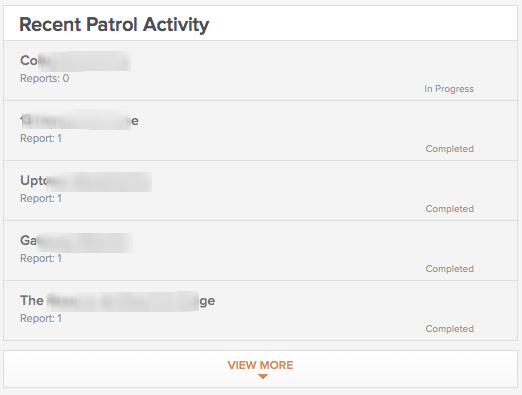
- Recent Patrol Activity
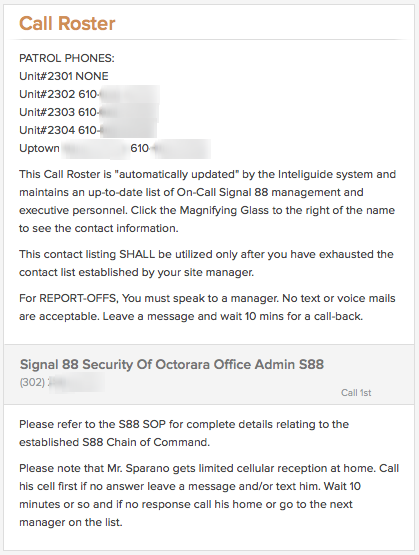
- Call Roster
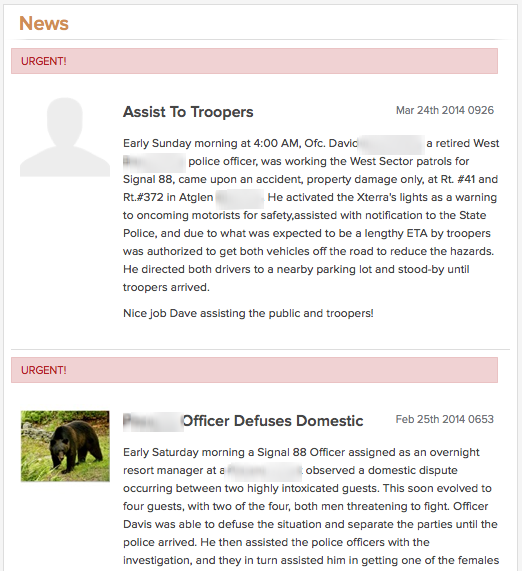
- News
- Access Info
- Page Footer Message
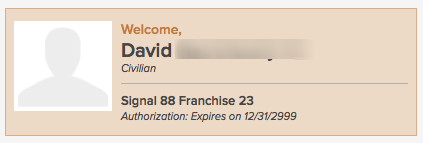
Featured top left, this informs you of your market and role, and when your account expires.
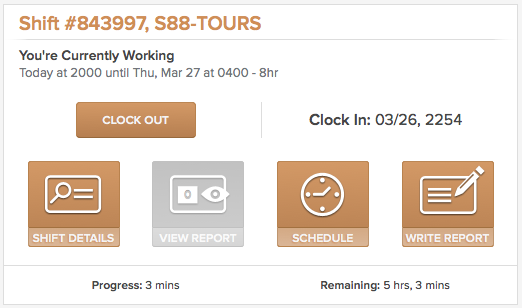
This presents information on the current Shift you're either scheduled for or actively working, and serves as an interface for accomplishing many of your work tasks from the web app dashboard.
- Clock In/Out
- View/Log Reports
- Access your Schedule and Shift Detail
- View duration and time remaining info
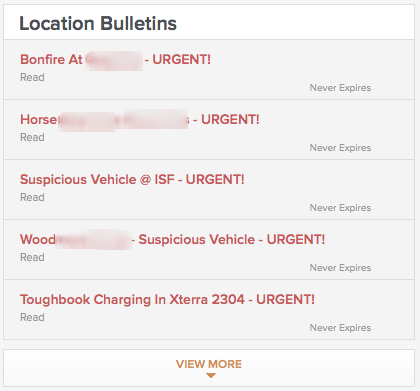
This section allows you to view location-specific info related to the Shifts you're either scheduled for in the next 30 days, or are actively working. Once you click/tap on a bulletin to reveal the full message, this action will be logged and you will be responsible for whatever information contained within; critical or otherwise.
These posts can be URGENT or Normal. The Urgent will always rise above the Normal posts whether they're read or not. Unread posts will always rise above read posts first for Urgent, and then for Normal posts. So if there is a View More button under the a list of Urgent posts, please do click/tap it to reveal any potential unread Normal posts.
These are links to Documents that are assigned to Shifts through Dedicated Work Orders. They feature Document Titles, Filenames, and expanding them will reveal the document Description. Clicking/tapping the Title will download the Document and log your viewing of it.
This is a log of any patrols that you've recently conducted and links to their associated Activity Reports.
This is an officer contact section defined by management. Essentially this section is a call list driven by schedules. Only those supervisors and managers on duty that are scheduled to appear on the roster at that time will be featured when the dashboard is loaded.
Administrators can choose to place specific instructions above and below the actual contacts defining the protocols behind the information presented and how to properly use that information.
News items vary between Normal and Staff Feature posts. These posts can be marked URGENT, like Location Bulletins. They're ordered by the most up-to-date URGENT first, followed by Normal posts.
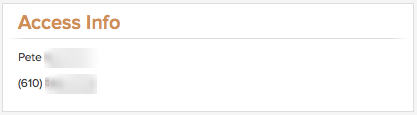
This is a text based repository for any door access, access contacts, or any other access type information. Door codes, gate codes, lock box codes, and other important information can be featured here.
Administration may choose to put any type of general information here, but typically this is a description of Inteliguide.

An example of the full Dash
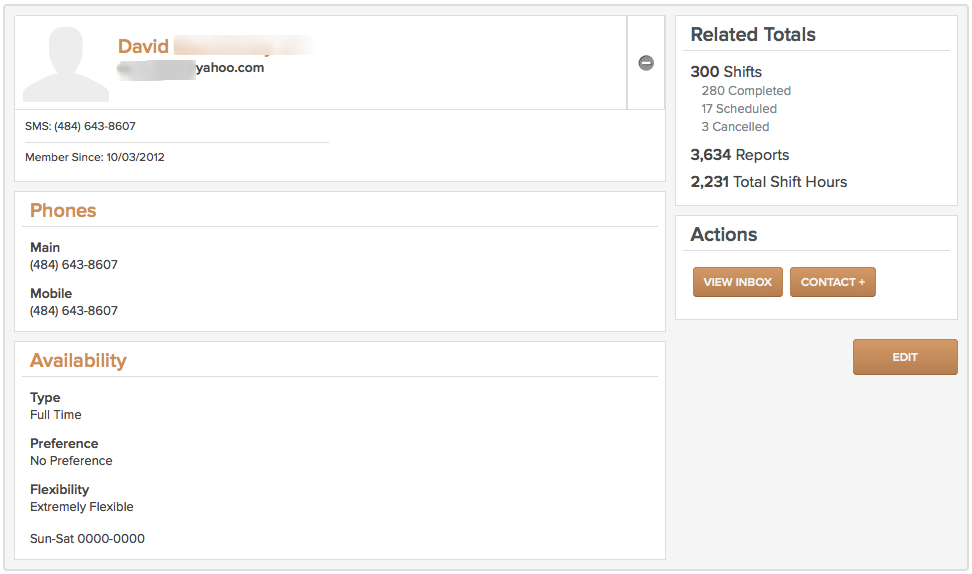
Your Profile & Settings
Clicking/tapping on your Name or Profile Pic on the Dashboard or dropdown Context Menu in the top right corner of the screen will bring you to your Profile.
There you can view your basic Profile information:
- Name
- SMS Number for Shift Commitment Notices (if any)
- Member Since Date
Left Column
Featured below are your account phone numbers.
Below that you can find your Availability if you've filled one out.
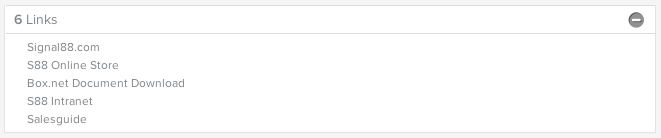
Finally, you can view any external links belonging to any of the markets that you're actively authorized to access.
Right Column
The right column starts with your work stats.
Below your stats is the Actions panel that allows you to navigate to your Inbox or jump right to the Contact Management feature.
Officer Profile View Example
Additional Profile Links may be present, depending on your market settings
Lastly, clicking/tapping EDIT will bring you to the Edit Your Profile Form where you can edit your Name, Email, Phones, Password, and Shift Notification settings.
Shift Notifications
- SEND ME A NOTIFICATION WHEN I COMMIT TO A SHIFT - If checked, you'll get an email with a calendar appointment attachment and an SMS alert (if you have an SMS contact number entered) whenever you commit to or are scheduled (by a manager) for a shift.
- REMIND ME OF UPCOMING SHIFTS I'M WORKING - If checked, this allows up to two shift commitment reminders to your email and SMS (if you have an SMS contact number entered) depending on how far you are away from working the shift. If more than two weeks, you'll receive a reminder a week prior, and one more the day before.
- NOTIFY ME WHEN ONE OF MY SHIFTS IS CHANGED - If checked, this will trigger a notice via email or SMS (if you have an SMS contact number entered) when a shift you're scheduled for changes in any way other than being reassigned. A notice back to you when it's been reassigned will be coming soon!
Make any necessary changes and enter your password and confirmation and hit SAVE.
Edit Your Profile Form Example

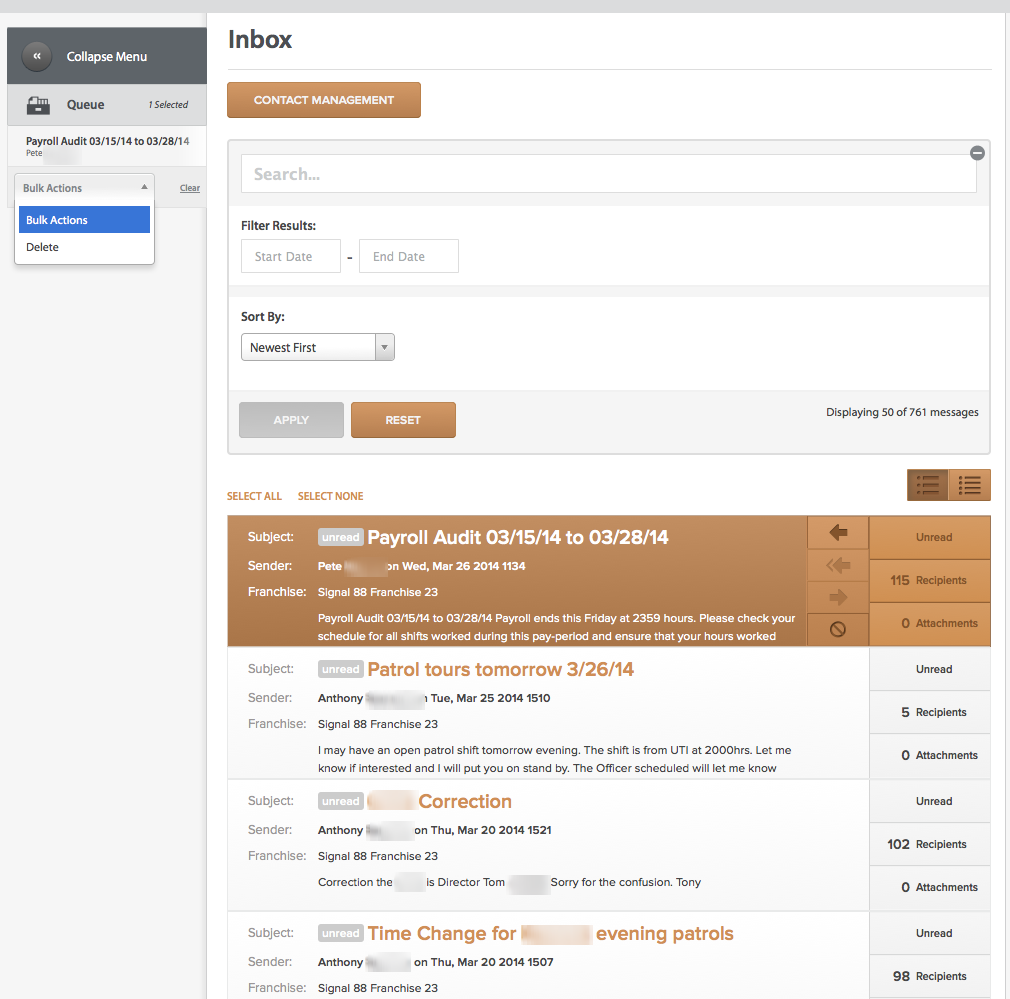
Your Inbox
This is where you can find all internal Inteliguide Messages sent directly to you. Opening these messages will log that you've done so. You can search for a date range and sort by newest or oldest first.
Inbox List Navigation
Selecting a message by clicking/tapping anywhere there's not a link or an icon will highlight the record and put it in a queue. Selecting multiples will allow you to delete them using the Bulk Delete Action (shown expanded).
Clicking/tapping the message Subject Link will bring you to the message content and log your view if you're clicking/tapping on it for the first time.
Clicking/tapping on the 'no smoking' icon will allow you to confirm and delete that message.
Finally, clicking/tapping on the 'left' icon will allow you to reply directly to sender.
The inbox list uses "infinite scrolling" technology. That basically means the longer you scroll down the screen, the more records will load until they're all loaded. As you scroll, the search and filters panel will follow along with you and adjusted the 'Displaying' label accordingly as more messages are loaded.
Full Inbox Example
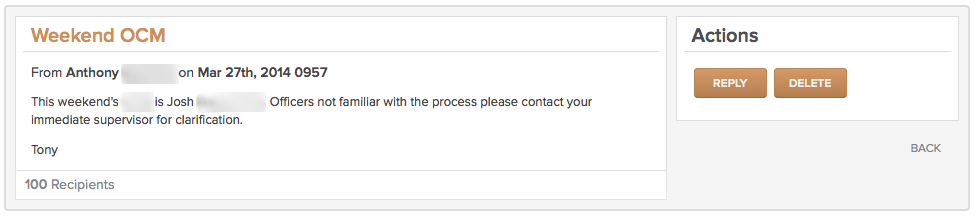
Message Detail View Example
Expanding the Recipients panel allows you to view an alphabetically ordered list of message recipients, including you. You can delete or reply to the messages using the Actions panel to the right of the message details.
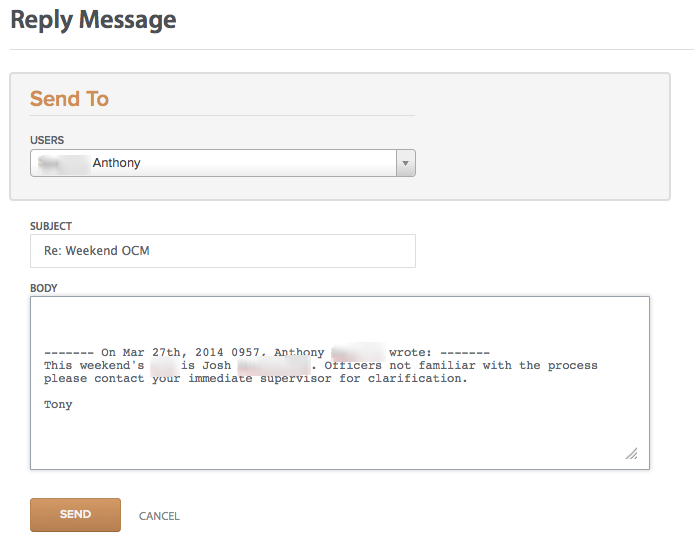
Message Reply Example
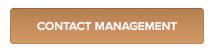
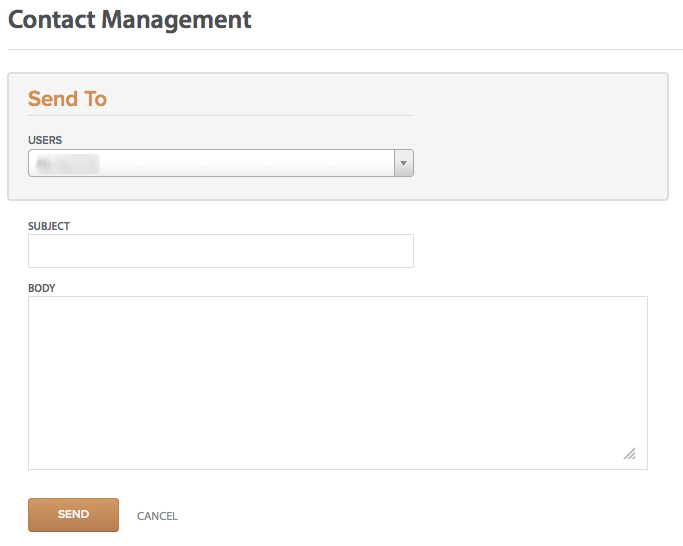
Clicking/tapping CONTACT MANAGEMENT will allow you to select an active manager and compose/deliver them a message.
Click/tap SEND after selecting an admin user from the users selector, defining a subject and entering your message into the body field.
Shifts, Schedule, & Agenda
You can access your schedule by clicking on SCHEDULE on the main navigation.
Your schedule plays a critical role in keeping you aware of your shift obligations, and can be used to commit to available shifts for those markets that allow their staff to make their own shift commitments.
Shifts
Your schedule and agenda are comprised of shifts. You can think of shifts as appointments on Google, Outlook or your smartphone's calendars, for example.
Shifts have many statuses that will change as you progress through working them. The ones that are relevant to you are:
- Available - Can be committed to by you
- Scheduled - You're assigned to work these shifts
- In Progress - You're currently working this shift
- Completed - You've completed working the shift
Shifts are also available to Teams:
- ANY Team (Cop or Civilian users can see and commit to these)
- LEB Team (Law Enforcement Based - Cop users can see and commit to these)
- CBS Team (Civilian Based Security - Civilian users can see and commit to these)
Depending on your role, you'll be able to see your shift assignments (those you've committed to or that you've been scheduled for) and all future available shifts that your assigned Team and role allows.
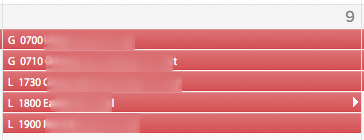
Anatomy of a shift on the schedule
Your shifts are divided into four parts left to right:
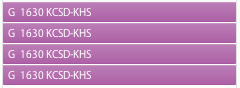
- 'L/G' icons - The 'L' means the Shift you're looking at was created for a single location. The 'G' means the Shift was created for a group containing one or more locations.
- Start time
- Officer name - omitted for available shifts
- Locale - either a group or location
A kind of fifth feature appears lastly on the very right of the shift on the schedule. That's a 'right' arrow icon. This indicates that the shift flows into the next day.
Scheduled shift that starts in one day and ends on the next: 
Available shift: 
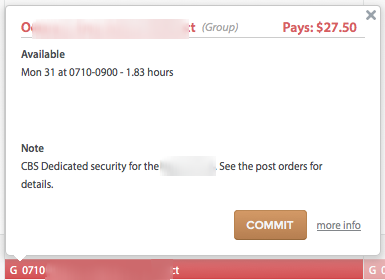
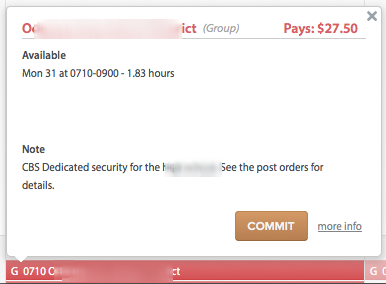
Clicking/tapping on any of the shifts on your schedule will reveal info and options depending on the status of the shift. Click 'more info' to view shift details.
Your schedule comes in three forms:
- Schedule Calendar
- Print Schedule
- Agenda - which is also printable
All three forms present the information slightly differently depending on your needs.
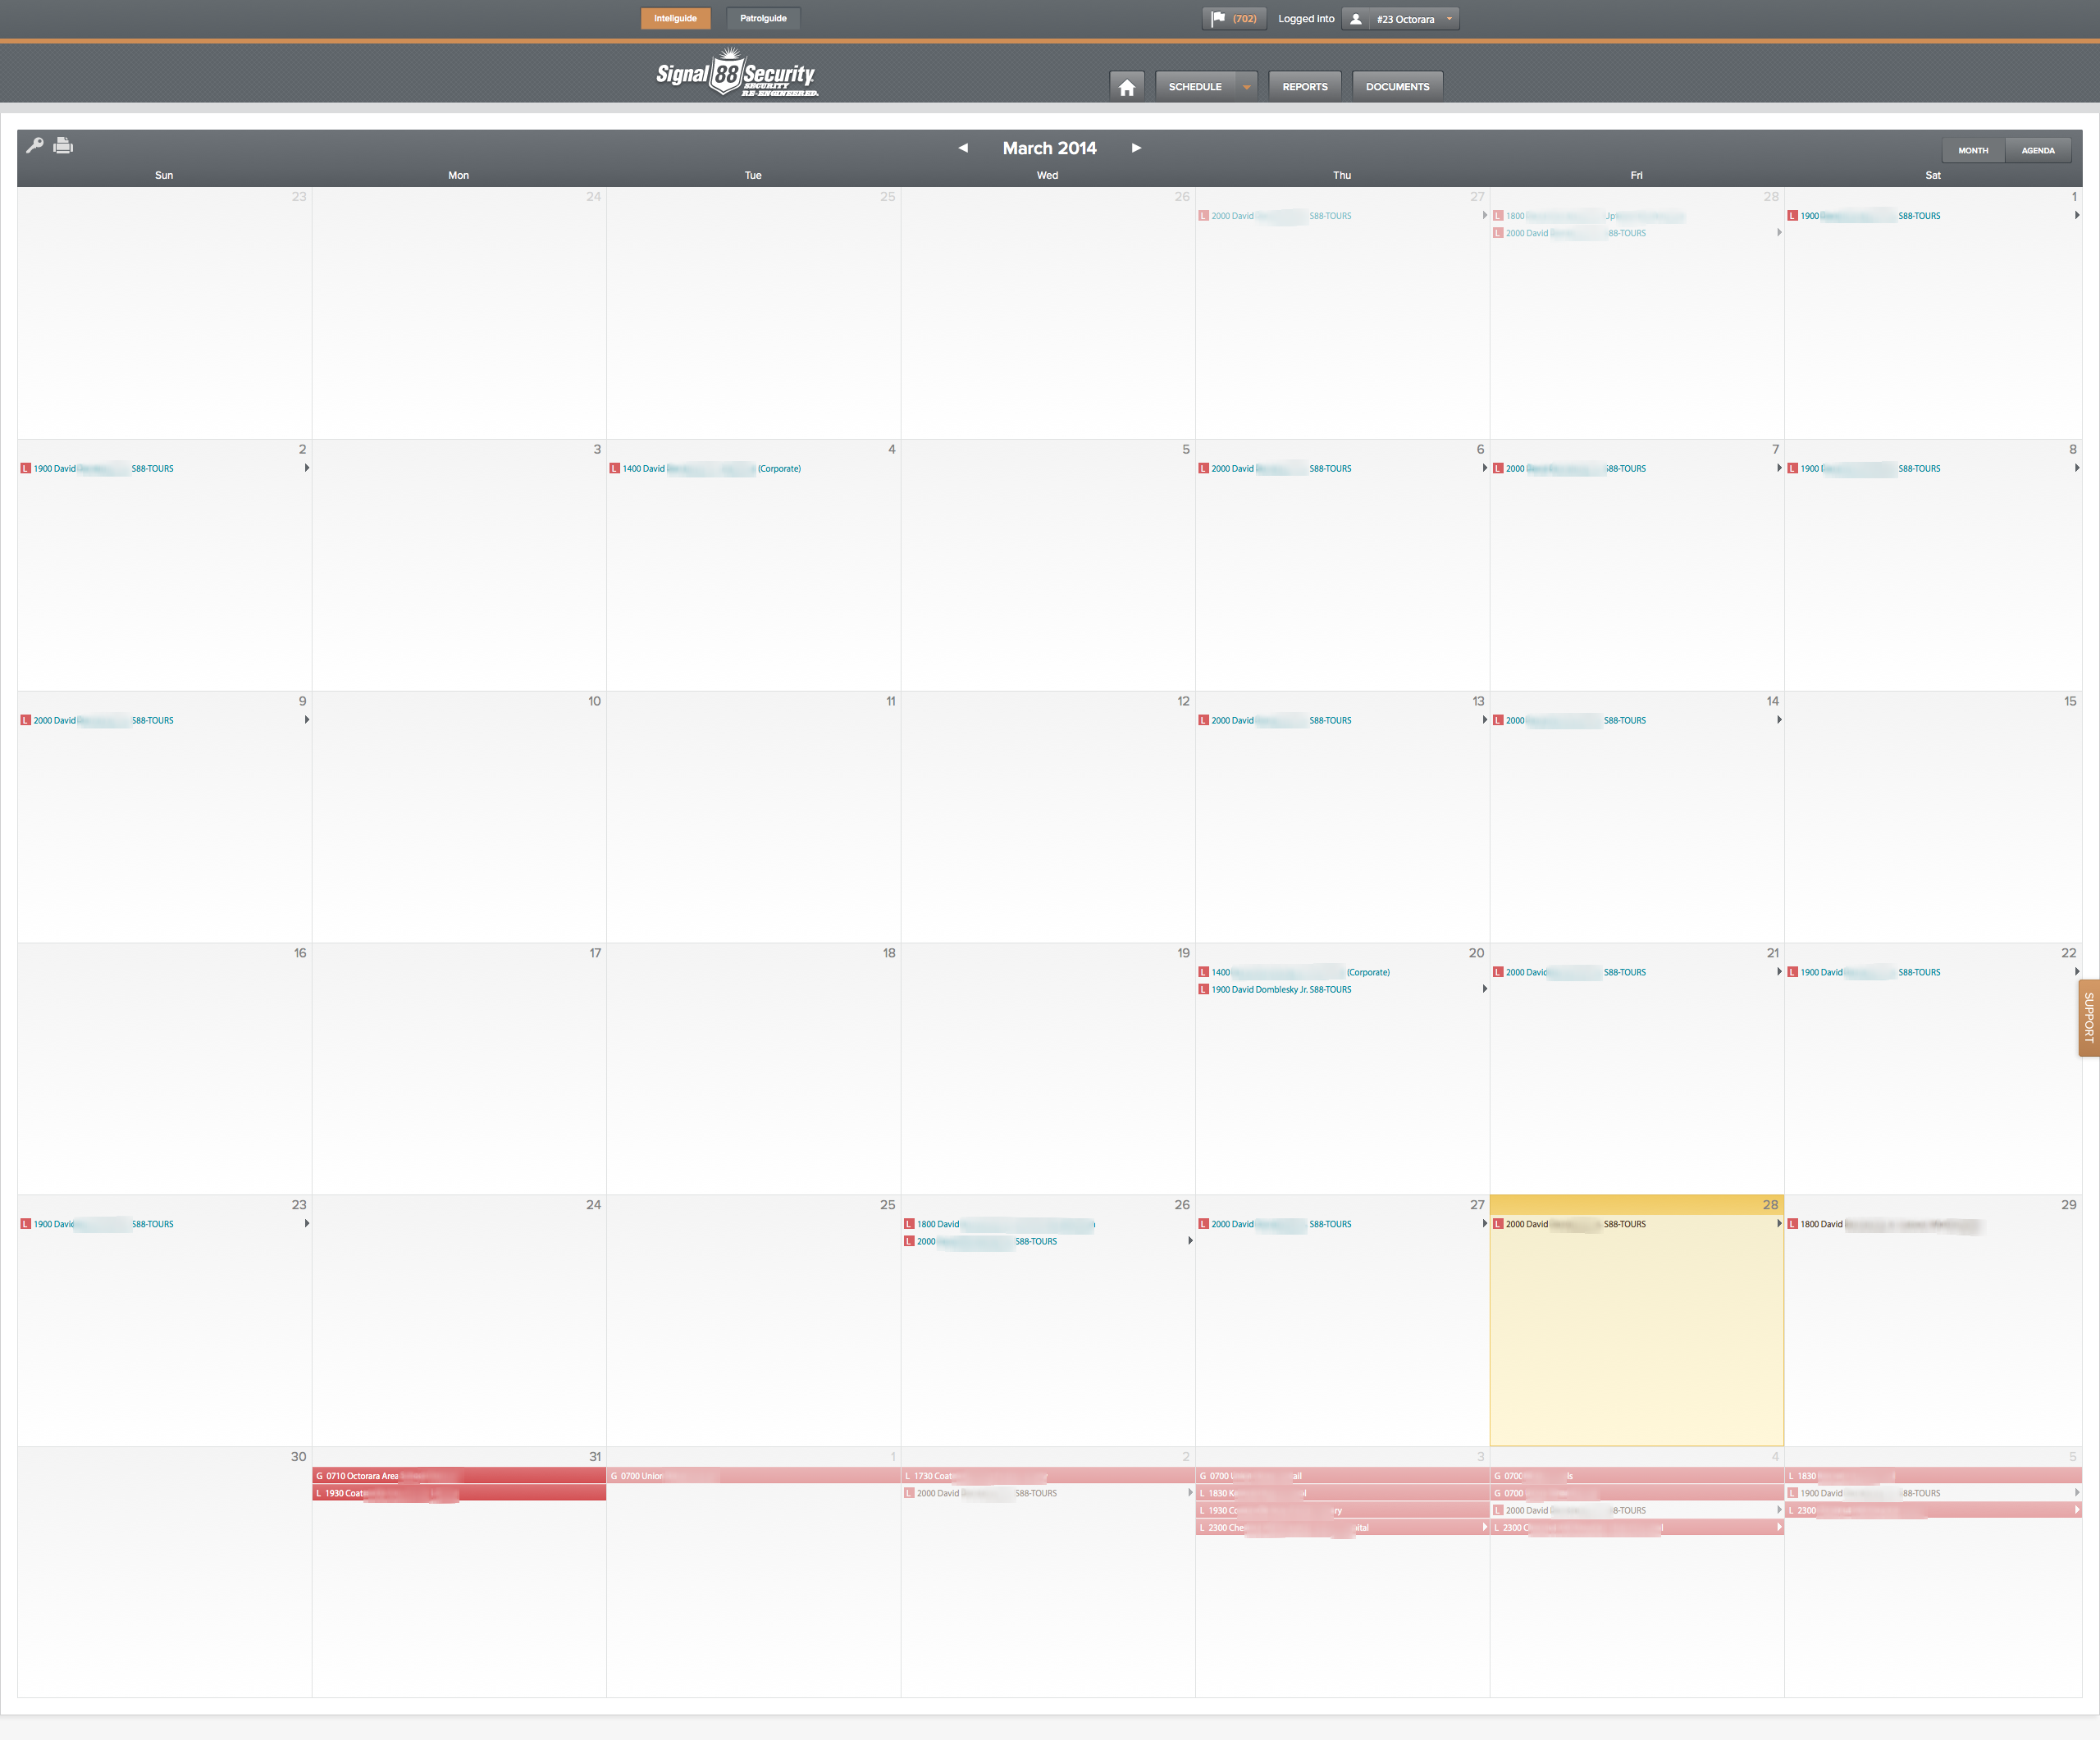
Schedule Calendar
This is the most interactive form of your schedule, and allows you to make commitments to available shifts directly on the calendar.
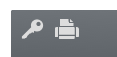
At top left are the 'key' and 'print' icons.
Clicking/tapping the key reveals the following toggle filter:
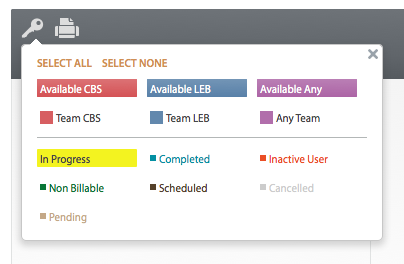
The key portrays all the possible states and statuses of shifts that could appear on your schedule and allows you to toggle them on and off. Clicking the 'print' icon honors your key toggle settings and will give you a printable view of your schedule.
Full Screen Civilian Example
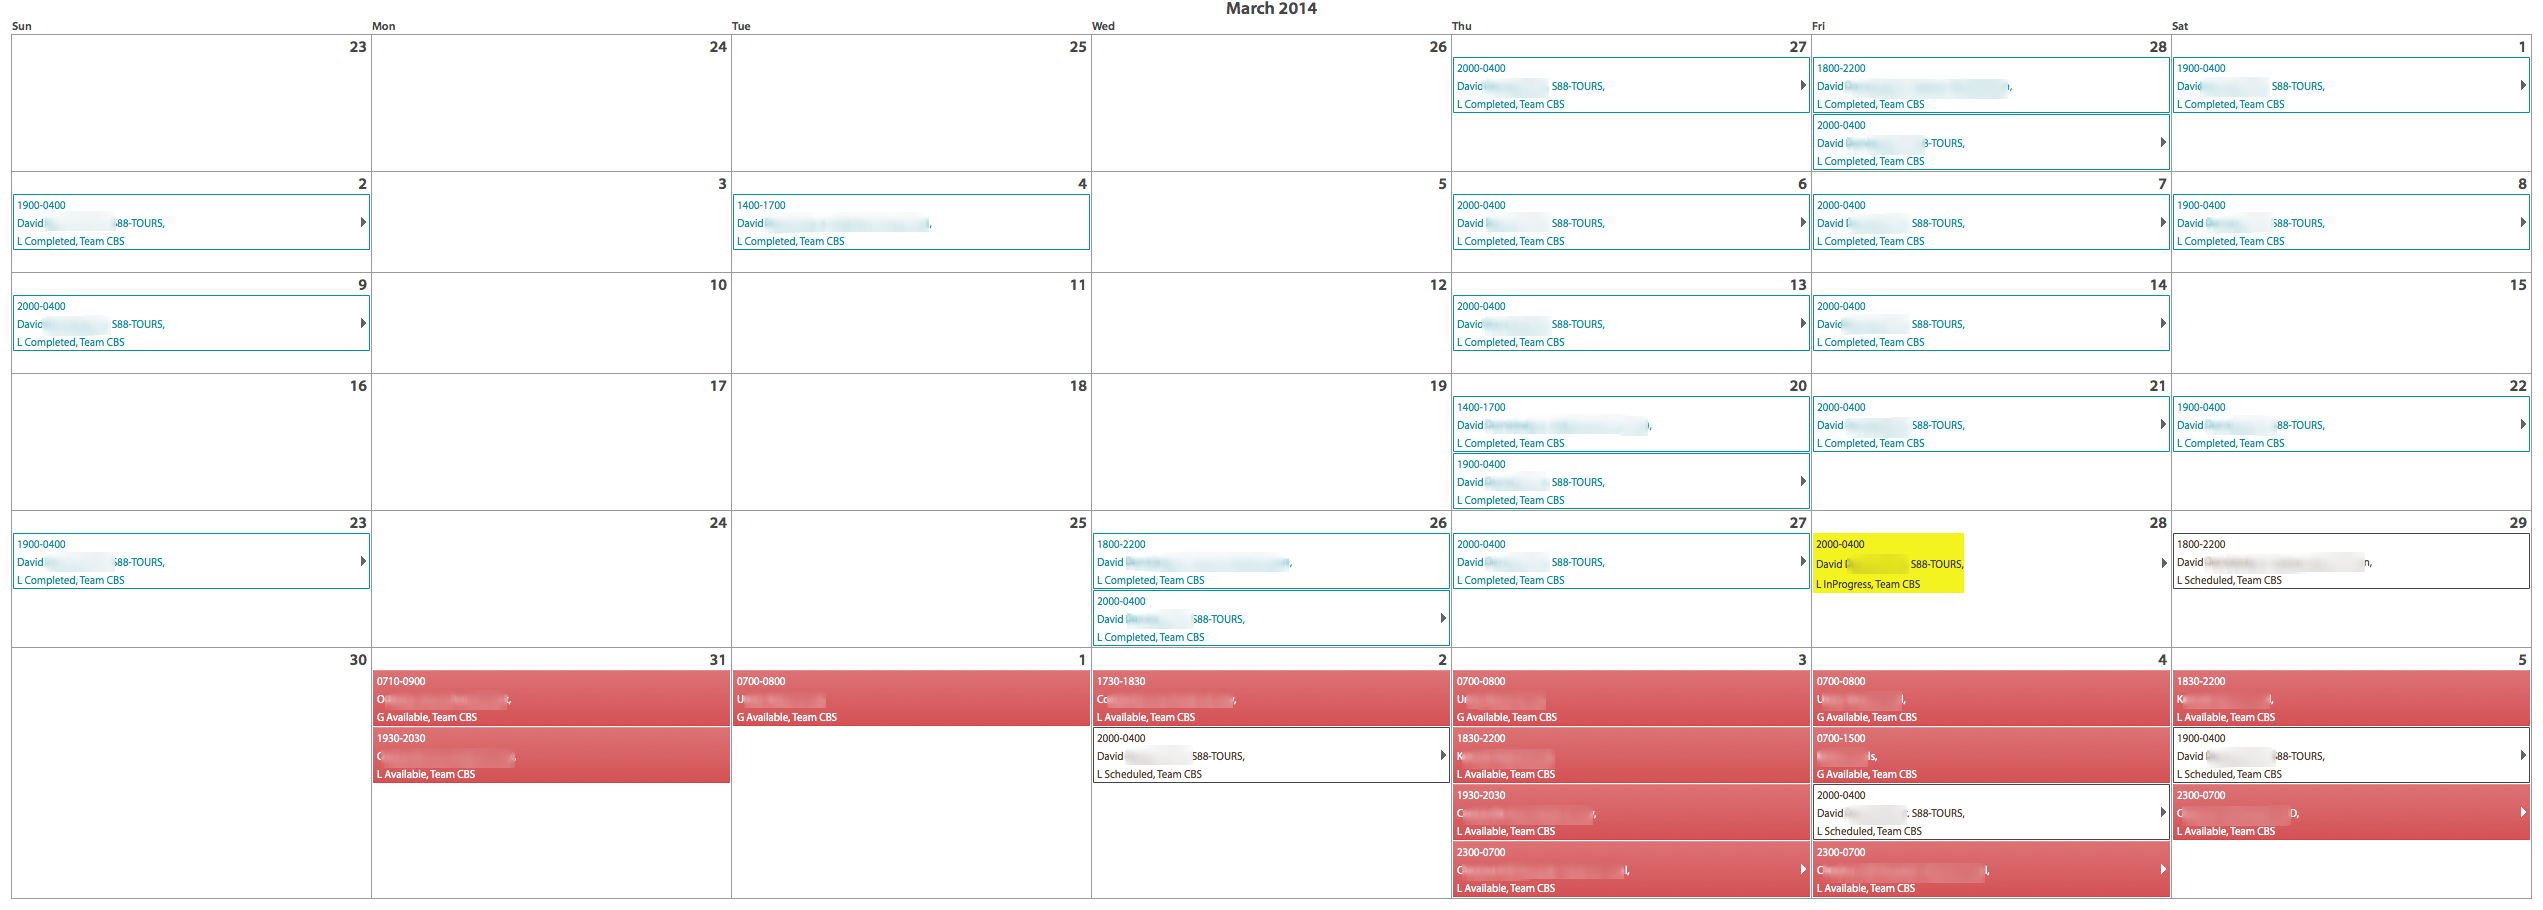
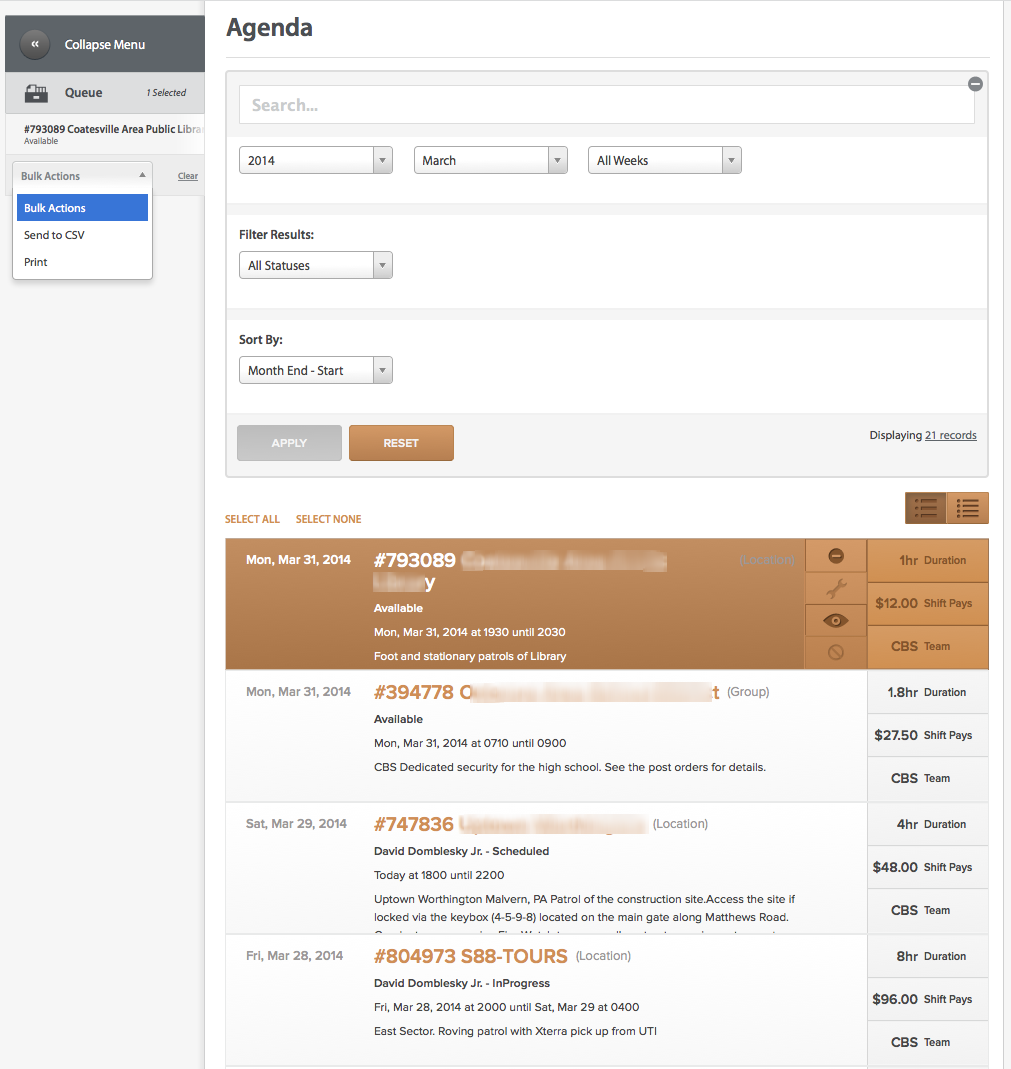
You can access the agenda by clicking/tapping on the AGENDA tab on the schedule itself OR by hovering/tapping over the SCHEDULE tab down arrow on the main navigation and clicking/tapping Agenda on the menu flyout.
Here you can search, filter, and sort a list version of your schedule. Click/tap on the main shift link or the 'eye' icon to view shift details.
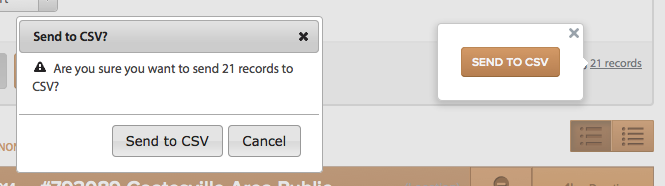
You can select one or many of your shifts and either send them to a CSV (comma separated value) file or straight to your printer using Bulk Actions.
Like your inbox, your agenda is an infinitely scrolling list. Scroll down the page to load more records until all of them have been loaded and use the 'UP' arrow icon to quickly get back to the top of the page. You can then easily click/tap the SELECT ALL link to select all of your records for printing.
To quickly send your entire month's worth of shifts to CSV, you can click on the underlined link where it shows how many shifts in the month you have access to. You then get a handy popup and confirmation that will send the CSV file direct to your inbox.
Finally, to send shifts from across multiple months to CSV or to print, simply filter by the month, select the shifts you want, and then filter by the next month and do the same. So on and so forth you can queue up to 1000 shifts from across as many months as you want. When you're done queuing shifts, use the Send to CSV or Print Bulk Action.
Quick Send to CSV
Full Agenda Example
Shift Details
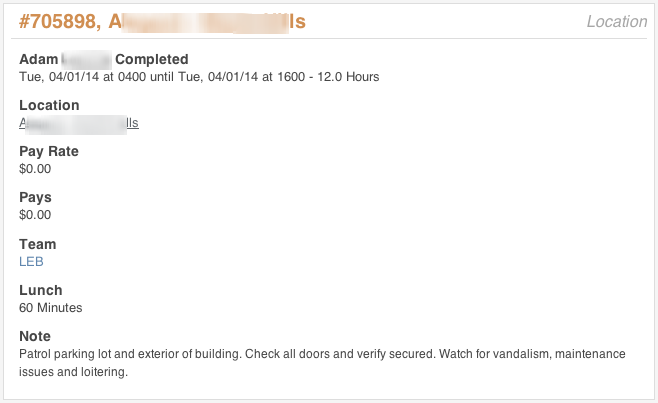
This screen is the centerpiece for any shifts that you'll be assigned/committed to, and/or working. Here are the possible sections that you may encounter depending on settings and content.
Left Column:
Right Column:
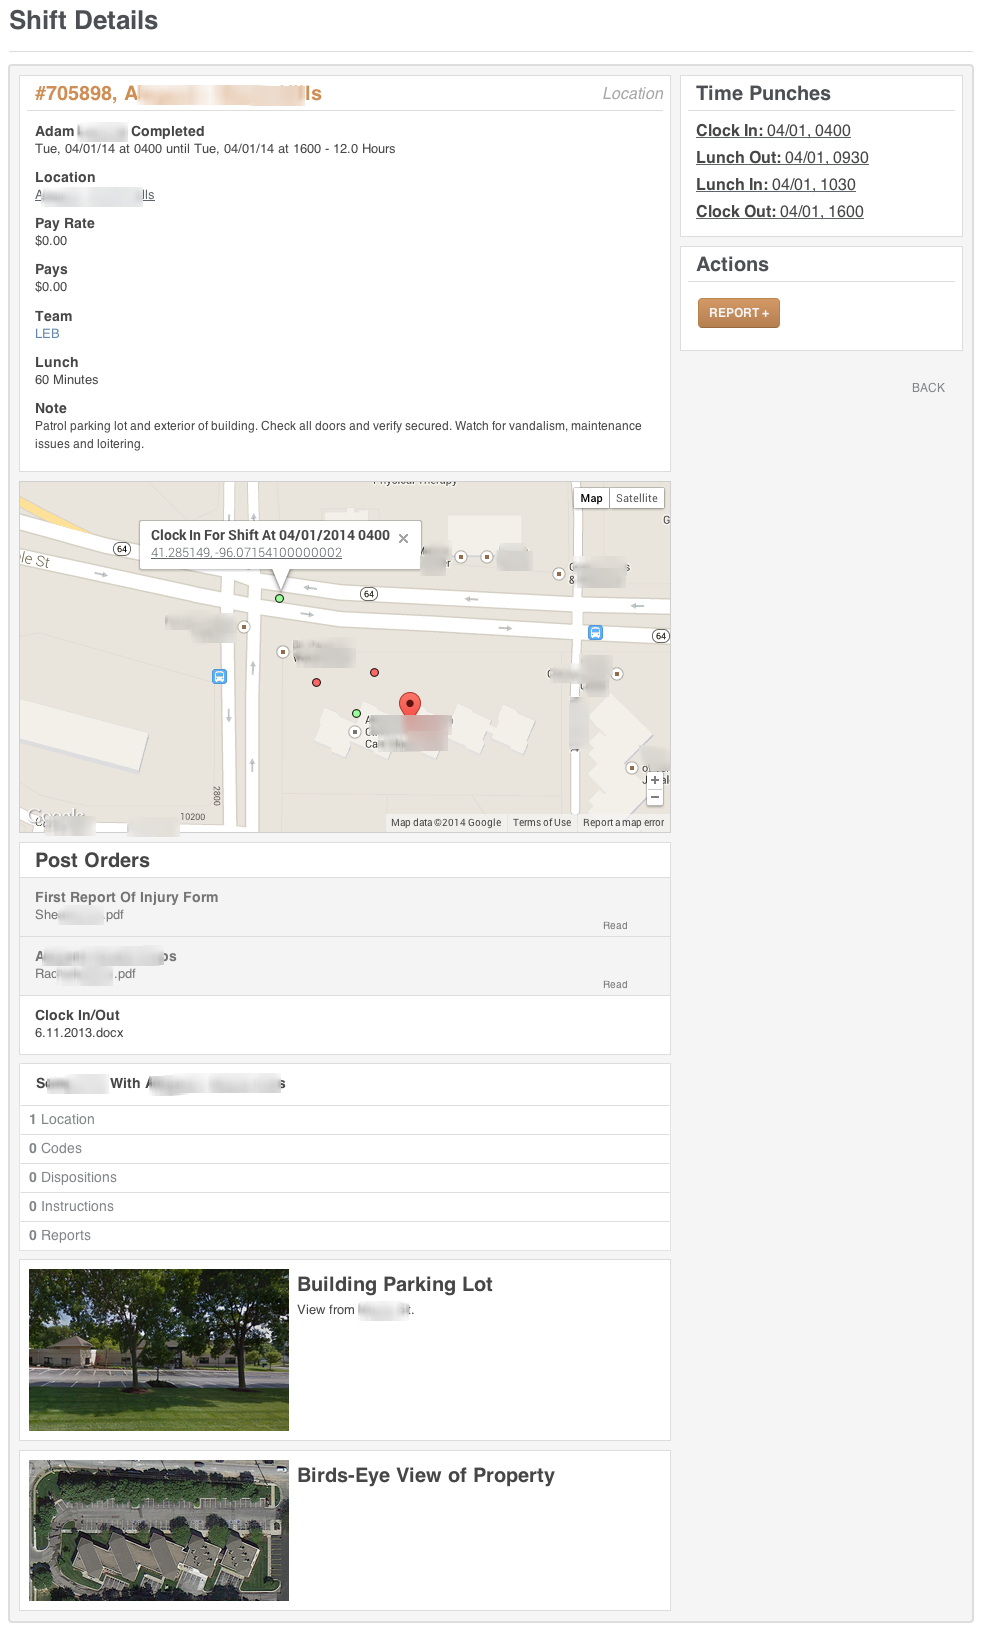
This is where you'll find shift related information. From the Shift ID to the locale (group/location) associated with the shift. Depending on settings, you'll see up to all of the following:
- Officer Assigned (either you or Available)
- Dates/Times & Duration
- Locale (Location/Group)
- Pay Rate
- Pays (total)
- Team
- Lunch Duration (if any)
- Note
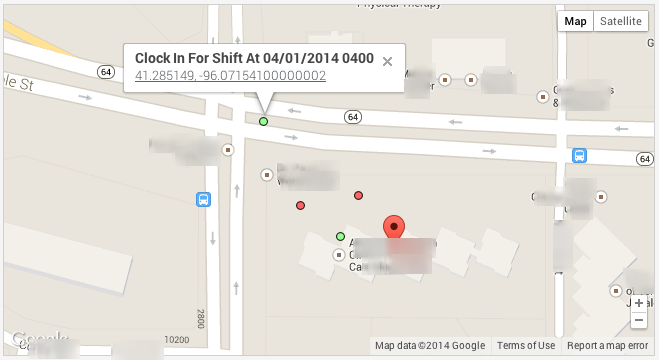
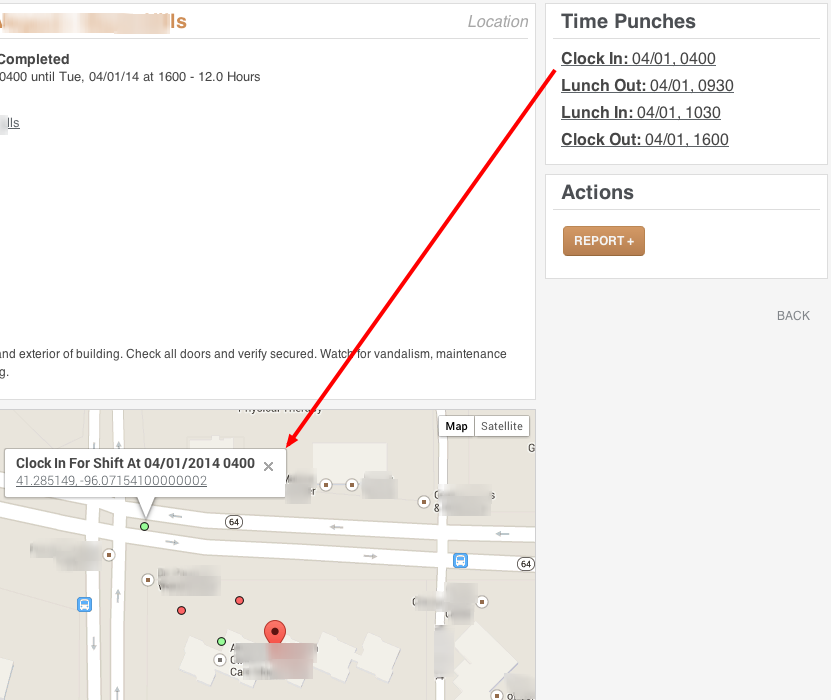
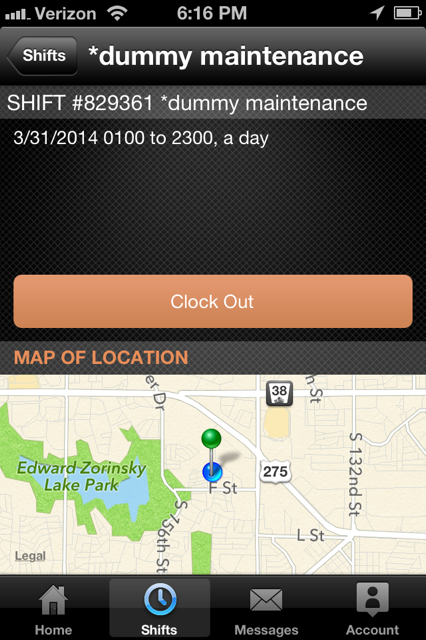
Featured is a map of all the locations covered by your shift. You shift could consist of one or many locations, and you'll see a separate marker on the map for each covered location. You'll also see a marker placed for every time punch that you make on a location services enabled device.
Clicking/tapping on the markers will give you detail for time punches or address information. The small circles represent time punches (green for clock/lunch in, and red for clock/lunch out), and the location markers that we're all so familiar with on google maps represents the location(s) you'll be working.
Clicking/tapping on the '(map)' link in the locations collections will find the relevant location marker on the map and will open the information popup as though you had clicked/tapped on it. This is helpful for when separate location markers are very close to each other depending on your map zoom level.
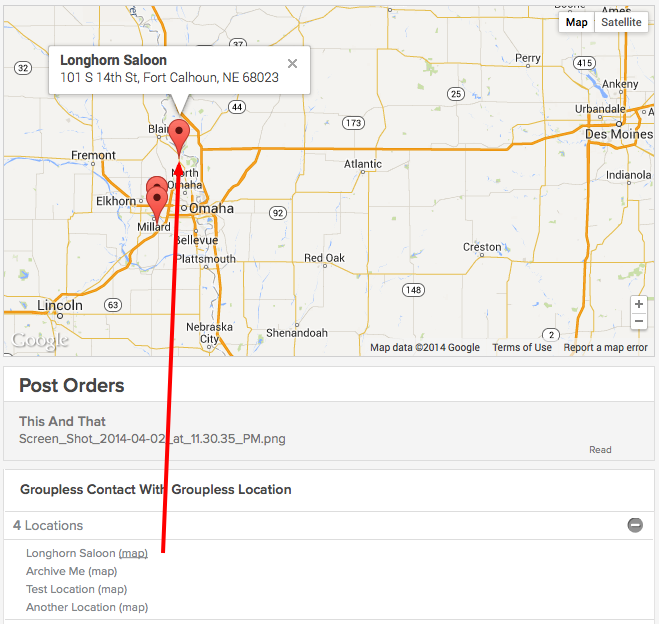
Map with Time Punches Example
You can see in the example that a clock in time punch was made from a car on approach to location.
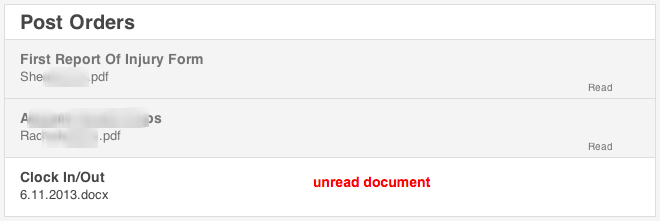
Shifts that are generated from dedicated work orders can have post orders assigned to them. These are links to one or more existing documents in the system that bear some relevance to the shift in question. Be mindful that downloading/viewing a document will be logged for accountability reasons.
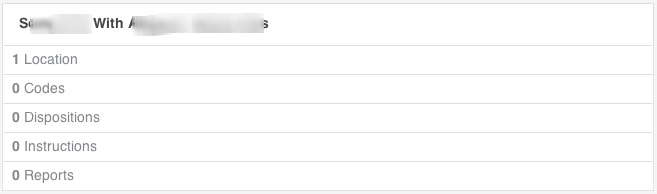
Expandable panels containing the following:
Contacts (optional):
- These appear for shifts generated by dedicated work orders that define contacts for the work orders.
Always seen:
- Locations (expand to access the 'map' links)
- Codes (expand to view what's accessible to you for activity reporting)
- Dispositions (expand to view what's accessible to you for activity reporting)
- Instructions (expand to view more on attire and other important shift-related instructions)
- Reports (expand to view/edit already logged reports)
Click/tap any of the panels to expand and view more information.
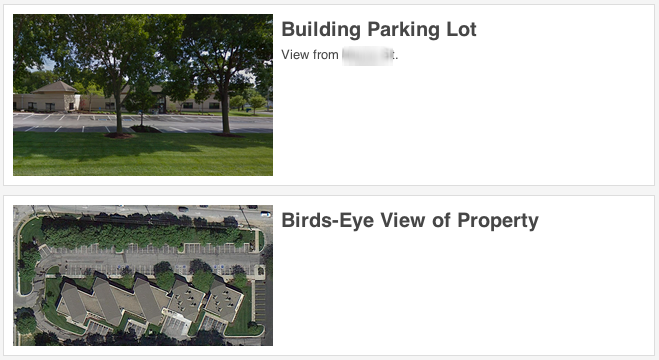
Shifts generated by dedicated work orders may feature premises pictures. Clicking/tapping them will produce a larger image and they may come accompanied by additional title and caption information.
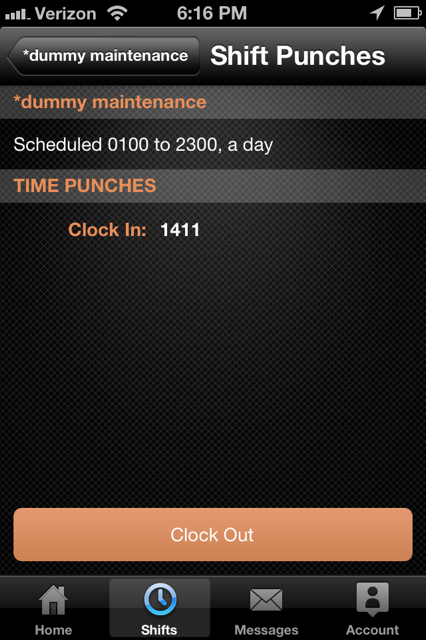
You'll be able to review any time punches you've made for your shift here. If you've made time punches with a location services enabled device that you granted permissions for the browser or app to use, your time punches will contain location information if accuracy allows. That will turn the time punch that features that location information in to link. Clicking/tapping it will focus that time punch on the shift details map.
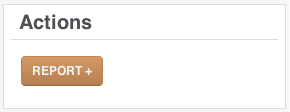
Depending on the status and scheduled date/time of the shift relative to your current date/time, you'll see either a COMMIT button or a REPORT + button.
- Clicking/tapping COMMIT will allow you to commit to an available shift from the shift details screen.
- Clicking/tapping REPORT + will allow you to log a new report from the shift details screen
Full Shift Details Example
Documents
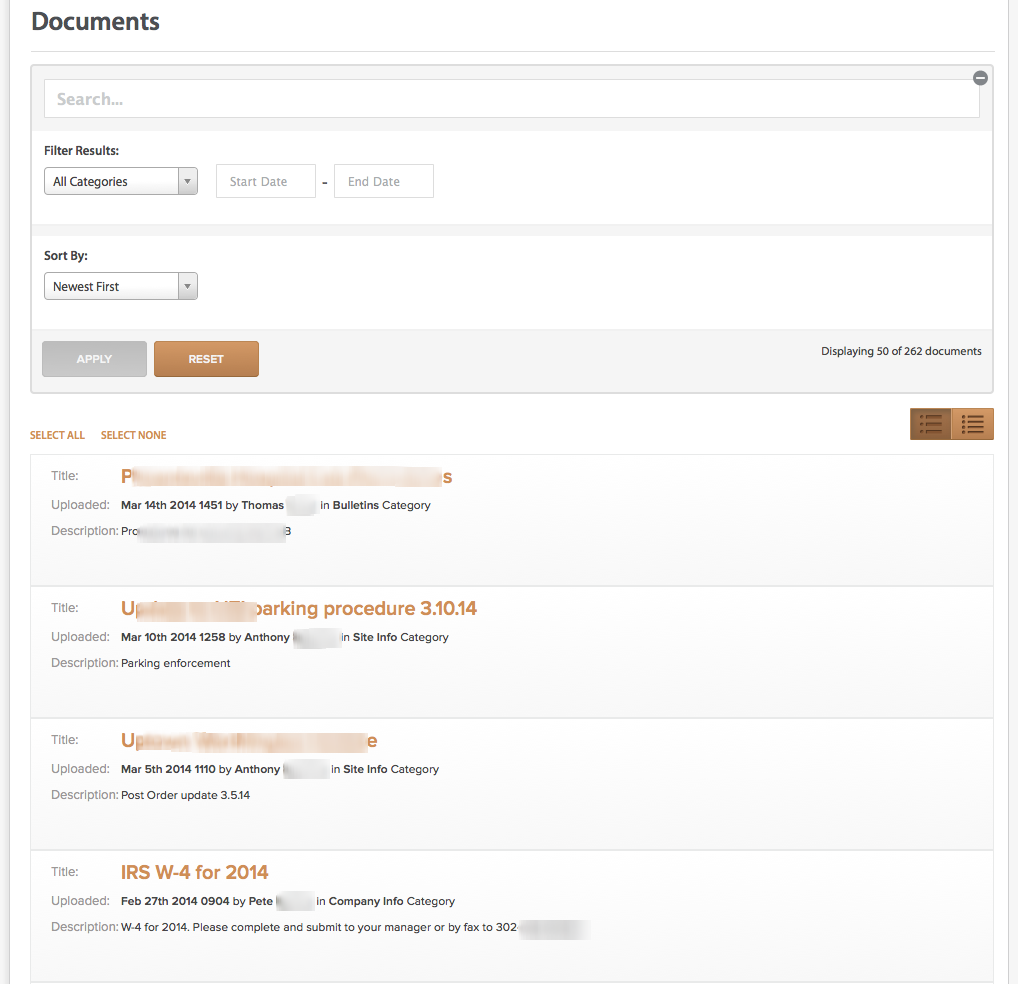
Here you can download and view documents that have been uploaded by management and made accessible to you. Clicking on the links will download the documents. Your downloading of the document will be logged for accountability reasons.
The Documents list uses "infinite scrolling" technology. That basically means the longer you scroll down the screen, the more records will load until they're all loaded. As you scroll, the search and filters panel will follow along with you and adjusted the 'Displaying' label accordingly as more records are loaded.
Search by name, filter by category and/or date range, and sort the list according to newest or oldest first.
Post Orders
Some shifts may have post orders that are linked to from shift details and the dashboard. These shifts are associated to Dedicated Work Orders that organize contacts, post orders, and premises pictures. The post orders are documents that have been uploaded specifically for communicating information about the shifts they're associated with.
These documents will be accessible independently of the post orders feature, but are brought into sharper focus and context when presented as post orders for their respective shifts.
Documents List Example
Committing to Shifts
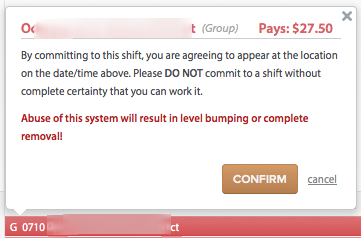
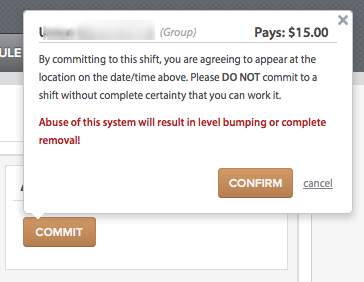
Click/tap on any available shift on your schedule or shift detail screen that interests you and confirm the commitment by clicking/tapping CONFIRM. You will be held accountable for the shift, as the confirmation states.
Committing on the Schedule
You can only commit to available shifts. These are shifts that have not been currently assigned to anyone. Your available shifts come in three Team flavors:
- ANY Team (Cop or Civilian users can commit to these)
- LEB Team (Law Enforcement Based - applies to Cop users)
- CBS Team (Civilian Based Security - applies to Civilian users)
ANY Team Availabilities
These can be seen by either Cop or Civilian officer user roles and appear purple on the schedule.
LEB Team Availabilities
Cop users will see blue LEB (Law Enforcement Based) available shifts in addition to any of the shifts they've worked, are working, or are scheduled to work in the future.

CBS Team Availabilities
Civilian users will see red CBS (Civilian Based Security) available shifts in addition to shifts already assigned to them.
Clicking/tapping on any available shift on the schedule will produce the shift info popup with a COMMIT button.
Clicking/tapping the COMMIT button will reveal a confirmation. Click/tap CONFIRM to accept.
Committing on the Shift Detail Screen
Clicking/tapping 'more info' on any shift info popup on the schedule (or clicking/tapping the main shift link or 'eye' icon on the Agenda) will take you to the detail for that shift. You can commit on this screen if the shift is available. The COMMIT button will be in the Actions panel to the right of the shift detail.
As long as the commitment is made for a shift that will be starting at some point in the future, you'll receive an email (and SMS - depending on your settings) notification upon committing to the shift.
Level Bumping & Removal
By way of explaining the shift commitment confirmation warning, complete removal means your employment termination. Level bumping pertains to every officer's priority rank. Your rank determines the priority that you're given when shifts are "released" by management to the schedule.
If you have a lower priority rank, you wait less before you see available shifts. Users with a priority rank of 1 don't have to wait at all to see and commit to released shifts. By contrast, a user with a priority rank of 7 will have to wait 6 days before they can see and commit to shifts released 6 days prior.
This has the effect of both positive and negative reinforcement. If you're a reliable and good worker, an increasingly lower priority rank means you're able to see and commit to the choice shifts that work the best for your schedule. By contrast, a higher priority rank can serve as a way to correct bad work behavior.
This is particularly effective with 1099 officers like off-duty law enforcement officers. Since the job determines the pay in the cases of 1099 officers, everyone vies for the highest paying shifts at the best locations at the best times.
Having a lower priority rank is highly desirable when selecting what shifts you'd like to work. Waiting days until the available work is potentially picked over can mean working less desirable shifts at less desirable locations. If you abuse your shift commitments, odds are your "level" will be "bumped" up and you'll have access to less and less desirable shifts.
Working Shifts
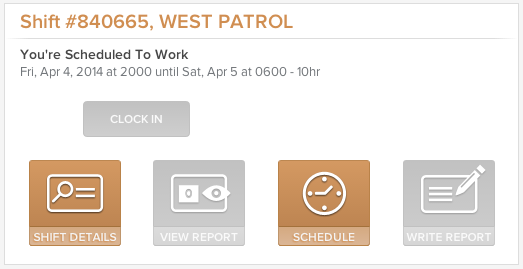
We've designed the dashboard to be your primary Inteliguide workplace. You'll be able to see the shift you're immediately scheduled for or currently working.
If you've worked a shift and clocked out, depending on how quickly your next shift is due to be worked, you may notice that the shift dash widget is quickly replaced with your next scheduled shift.
You will see your next scheduled shift within the next 30 days on your dashboard if you're not currently working one. Your CLOCK IN, VIEW REPORT, and WRITE REPORT buttons will not be accessible on scheduled shifts until your next shift is eligible to be worked. That eligibility varies depending on how your managers have defined settings, but the default is set to allow you to clock in up to a half hour before your shift. This is what you can expect to see for future scheduled shifts:
Otherwise, if you're clocked in and currently working a shift, you'll see something very similar to this:
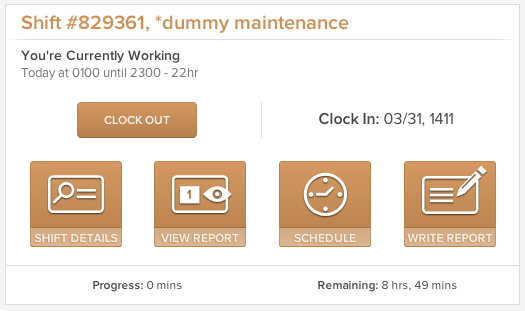
You'll be able to access the WRITE REPORT button, and if you've logged any reports, you can access them by clicking/tapping the VIEW REPORT button. Also notice that there is progress and remaining information available while clocked into your shift.
IMPORTANT NOTE: If, for whatever reason, you can't click/tap on the WRITE REPORT button due to it being inactive, you can still log activity reports by going to your schedule (click/tap on SCHEDULE in the main navigation clicking on the shift you're working, and then clicking REPORT + on its shift detail page)
Shift Lifespan
Every shift has a basic lifespan. This list may be augmented by other management requests and assigned duties, but following are the essential expectations.
- Commitment/Scheduling: Be aware of when you're committed to shifts and make sure to allow yourself plenty of time to be onsite, on time, and fully prepared to work by the time your shift starts. If you must call off any shifts for any reason barring immediate personal emergency, illness, or injury, submit a request for alternative arrangements well beforehand. Your shifts are your responsibility.
- Clock In: Be punctual! Review relevant Dashboard info, like location bulletins and/or post orders and any additional materials or instructions that may have been assigned to you.
- Shift Start Log: Be sure to complete any specifically requested start-of-shift reports such as inspections or shift preparation notes.
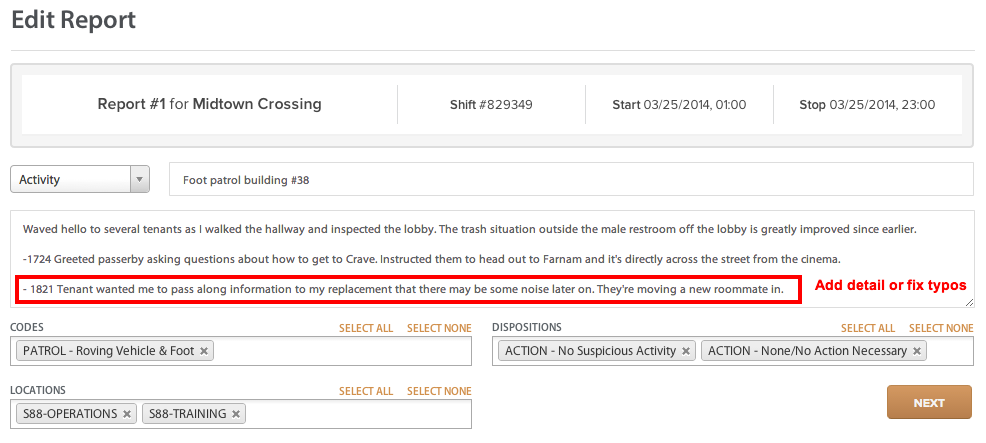
- Activity Reporting: Observe and report. Be detailed and thorough, and remark the approximate time of each important detail. Include unique details that are memorable. This helps brings value to the reports that you're writing, even if you have nothing critical to report. Examples can include eye contact with tenants and clients, a note about how bright the lobby looked after new lights were installed, etc. During your shift, you can edit already logged activity reports to add/update information or fix spelling, grammatical errors, or other typos that you might notice.
- Lunch: For those shifts that have a lunch.
- Shift End Log: Any final wrap up information as requested by your management.
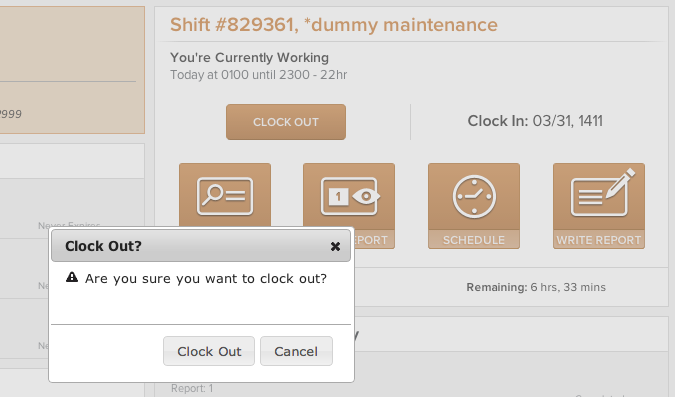
- Clock Out: If you go longer than the allowable clock out grace period after a shift ends (defaults to half an hour), you will not be able to log out without management intervention. In these cases there are usually extenuating circumstances, so your supervisor or management will take them into consideration.
- Retroactive Reporting: Sometimes, due to circumstances, you may need to log additional activity report information, or retroactively log activity reports you may have been compiling during your shift. Simply go to your schedule, click/tap on the shift in question, click/tap 'more info,' and then click/tap REPORT + to do so. You can only edit previously logged reports while you're clocked in and working shifts. So any additional information logged after the fact will have to be complied in a new report.
Time Punching & Payroll Info
Time & Attendance is a critical part of working any shift in Inteliguide. Time punches track the following for shifts without lunches:
- Clock In
- Clock Out
and the following for those shifts with a lunch included:
- Clock In
- Lunch Out
- Lunch In
- Clock Out
IMPORTANT NOTE: If your CLOCK IN button is inactive (grayed out) before your Shift, please try to refresh the screen. It may be that you're restricted from making a time punch by settings that define the allowable time beforehand to a very short amount. Another issue to watch out for is if there are time punches already there and your shift is still in scheduled status.
You can choose to use your desktop or mobile browser and the Shift Dash to make time punches and work your shifts. Alternatively, we encourage you to make time punches using the Inteliguide mobile app:
- iOS: https://itunes.apple.com/us/app/inteliguide/id601271993?mt=8
- Android: https://play.google.com/store/apps/details?id=com.lyconic.inteliguide.prod
iOS Screenshots
Tap to your shift on the shifts list. Tap the Clock In/Out button (depending on the punch type you're trying to make). Then tap the Clock In/Out button again to confirm on the following page.
IMPORTANT NOTE: DO NOT double tap the time punch button on the second confirmation screen, or you may get a false punch on the next status. For example, if you're trying to clock in for a shift and the app has a bad connection, or is delayed while talking to our server, then repeatedly tapping the button may cause other punches to pile up and execute when the connection finally does go through. That will cause mispunches that will have to be resolved by management.
Payroll Information
Payroll is calculated off your time punches. So you'll want to be sure to be as accurate as possible in making the correct punches at the correct time and at the correct location.
While Inteliguide calculates payroll reports based off your time worked in the system, that payroll information is often finalized and sent to a third-party for processing and eventual deposit into your account or printed to a check and sent to your physical mailbox.
Please contact your management for any past documentation or payroll questions/adjustments/concerns that you might have. Some managers may place a link in your profile that directs you to third-party employee self-serve tools online.
Logging, Viewing, & Editing Activity Reports
At any time while working your shift or afterward, you can log activity reports that can be read by client users of Inteliguide.
Logging Reports in Inteliguide
Click/tap the WRITE REPORT button to start drafting a new report while working a shift from the Inteliguide dashboard. You can only use the WRITE REPORT button while actively working a shift.
If, for some reason, your shift should be in progress but you can't clock in and can't click/tap the WRITE REPORT button to start a new report, you can alternatively access the REPORT + button on shift details actions by clicking/tapping on SHIFT DETAILS. Be careful that you're logging a report for the right shift as clocking out of your current shift may replace it with a future scheduled shift. If the shift dash widget doesn't reflect the shift you need to log a report for, you can access the schedule by clicking on SCHEDULE in the main navigation, click/tap on the shift that needs the report, click/tap on the 'more info' link, then click REPORT + on the shift detail screen.

You can also log reports retroactively for any shifts you've already worked and completed. Do this by clicking/tapping any shift on your schedule and clicking/tapping the 'more info' link. Once on the shift details screen, click/tap the REPORT + button.
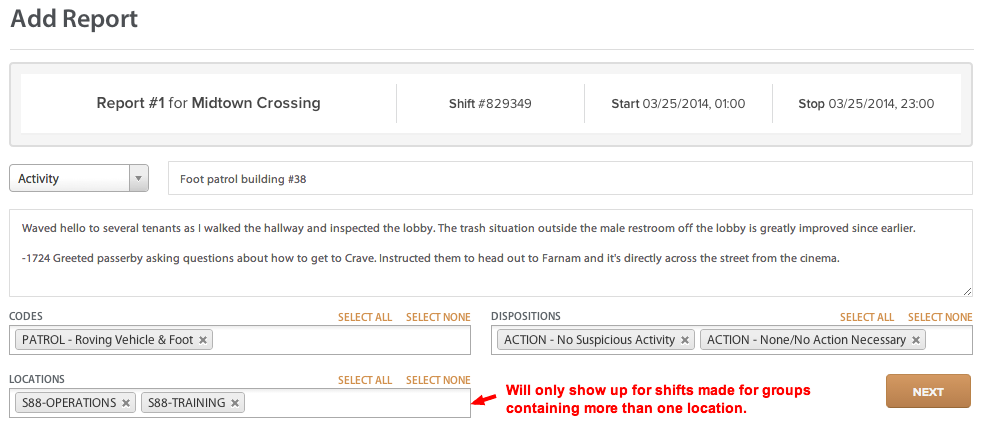
Once you're able to access the Add Report Form, you'll see something like this:
![]()
Required fields:
- All
- Report Category
- Report Summary
- Detailed Note
- Codes
- Dispositions
- Locations (for shifts made for groups containing more than one location)
You may notice that the NEXT button is deactivated or gray in the example above. This is due to the fact that you must fill all values in before you're allowed to proceed. Once the form has validated all your input, the NEXT button will activate and you can click/tap it to continue.
IMPORTANT NOTE: If you're using private browsing mode on Safari browsers to use Inteliguide, in some cases you cannot continue logging your report. Even filling in all required values does not work to activate the NEXT button. To correct this, disable private browsing mode and try and log your report again.
Report Categories & Codes/Dispos
Report Categories are Activity, Flagged, Maintenance, and Incident.
- Activities are your typical, "all clear, nothing important to report but I delivered excellent security value" reports. It's "nothing to see here" but also a unique message to the client. It's important to not only provide, but also prove the deterrent effect that clients are paying for. These, hopefully, will be most of the Reports that you file.
- Flagged are elevated Activities deserving of some additional attention. This can be as simple as a compliment paid by a tenant or client about the quality of service you're providing, or as complex as something that requires the client's attention. Flagged Activities don't quite qualify as Maintenance or security Incidents in nature, and can serve as a catchall for when those other two or just a regular Activity isn't appropriate. A good example would be a tenant loading a large truck that partially blocks the sidewalk/parking/drive, and a propped open secured access point. This isn't really maintenance, or a crime, it's just something to note as that could be used in conjunction with piecing together a potential related Incident event; perhaps the propped open door allowed access to a restricted individual in the same building that later led to an actual incident, for example. Any Flagged Reports will need to be justified with a quick note on why they're being flagged. This is to clarify the intent of singling the report out, as the intent is not otherwise as apparent as with Maintenance or Incident Reports.
- Maintenance are very clear and tied directly to maintenance requests or observations. Lighting assessments conducted or needed. Overflowing trash bins. Building/hallway lights out. Broken access points, locks, gates, concrete, or even median grass and weeds that are so overgrown that they obscure the view for people navigating to and from roads, driveways, and parking lots. Those are just a few of myriad examples.
- Incidents are clear security breaches, threats, disturbances, and crimes. These could and should also qualify for lesser security incidents, like parking violations, ban & bar, and confrontations due to loitering or any other kind of mischief. They hopefully will only constitute a small percentage of the Reports you file.
Report Codes/Dispositions are many related "tags" that are required to accompany your report. They may be general in describing the work you did while working your Shift (Site Observations), or very specific in how you reacted to an incident or request that you encountered onsite (Gas Leak… Called Utilities, for example). The Codes/Dispos you select often come with instructions on what to do next. Some markets have highly specialized Codes/Dispos according to their job sites, but the collection of possible Codes/Dispos that you have available to you for any given Location can be decided by your management. So if you often find yourself in need of a particular Code or Disposition, you can request that your management add new ones to their overall list or to the Locations where they're needed.
Report Attachments
You can now upload one or many attachments both in the mobile and web apps while logging your reports. Attachments are limited to 20 megabytes apiece for the web, and up to 100 megabytes apiece in mobile reports.
Mobile Activity Reporting
You can also log Activity Reports for Dedicated Shifts via the Inteliguide app on Android & iOS (Apple) devices. Please check out the Inteliguide Mobile App documentation for a comprehensive overview.
Filled Activity Report Example
Activity Report Confirmation
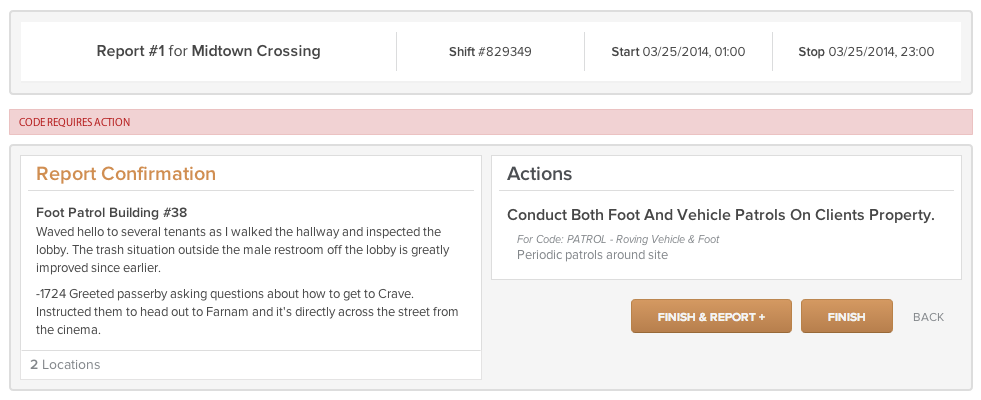
Click/tap FINISH to log the report and go back to either the dashboard or the shift detail page from where you came OR click/tap FINISH & REPORT + to log the current report and immediately start logging a new one.
Activity Report Caching
The system will cache your work as you fill out the report summary, detailed note, codes, dispositions, and locations. If you get interrupted for whatever reason, the system will try and load your saved work once you return to the add report form. The system caches report work until the report is filed on a shift by shift basis, so you can have several cached reports at one time and return to complete them at your leisure.
As mentioned above, if you have your browser in private browsing mode, the system is unable to cache your work properly and will not allow you to continue logging your report. To correct this, disable private browsing mode and try and log your report again.
Viewing Reports
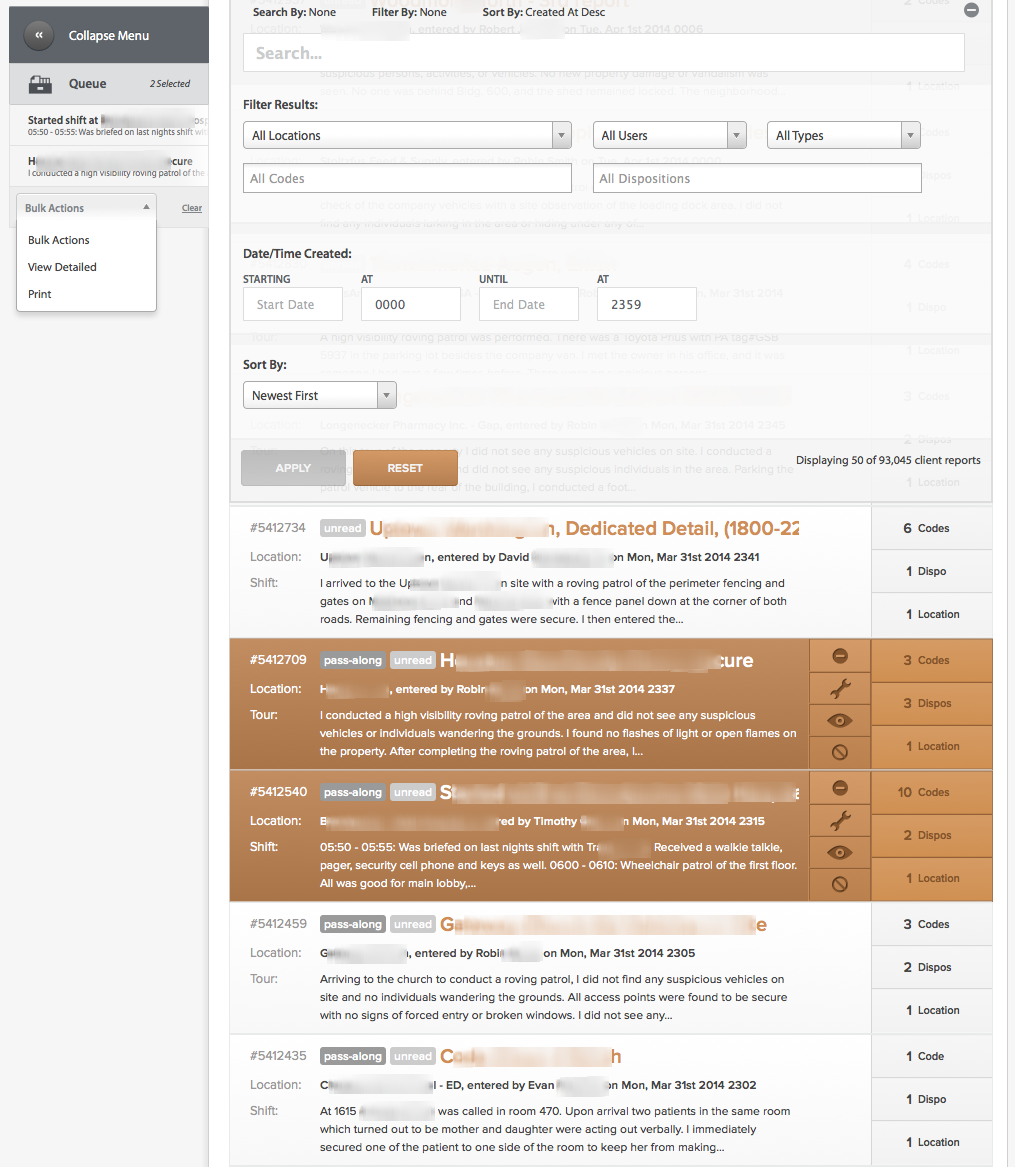
You can view any logged reports and any pass-along reports for locations you're currently working or are scheduled to work in the next 30 days by clicking/tapping the REPORTS tab on the main navigation.
Here you can view the reports that you and others have logged for your assigned locations. You can additionally, as stated below, edit reports for the shift you're currently working.
The Reports list uses "infinite scrolling" technology. That basically means the longer you scroll down the screen, the more records will load until they're all loaded. As you scroll, the search and filters panel will follow along with you and adjusted the 'Displaying' label accordingly as more records are loaded.
Viewing reports will be logged for accountability reasons, and you'll be able to quickly see which reports you've read and which you haven't.
Any reports written by another officer will be tagged with a 'pass-along' flag.
Searching & Filtering
You'll be able to search, filter, and sort the list to help you find specific information about whatever location you happen to be currently working.
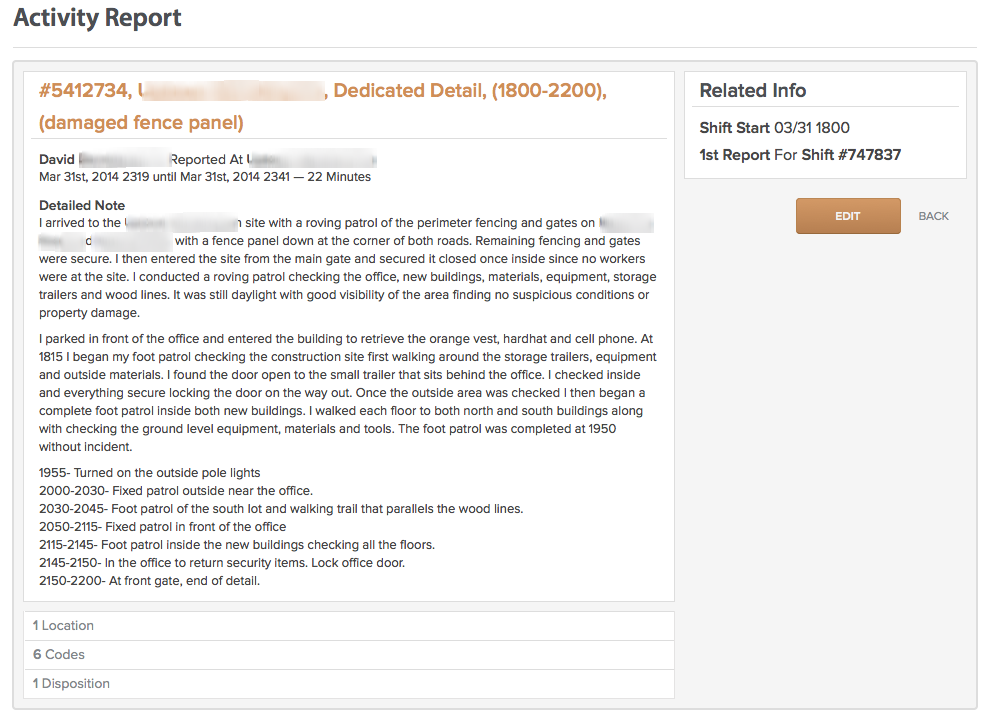
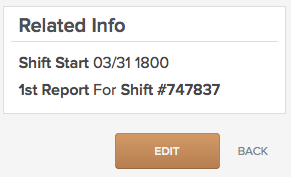
Clicking/tapping on the main report link will produce a report detail popup. Clicking/tapping the 'more info' link will bring you to a stand-alone detail screen that can be linked to if necessary.
Report Detail Popup Example
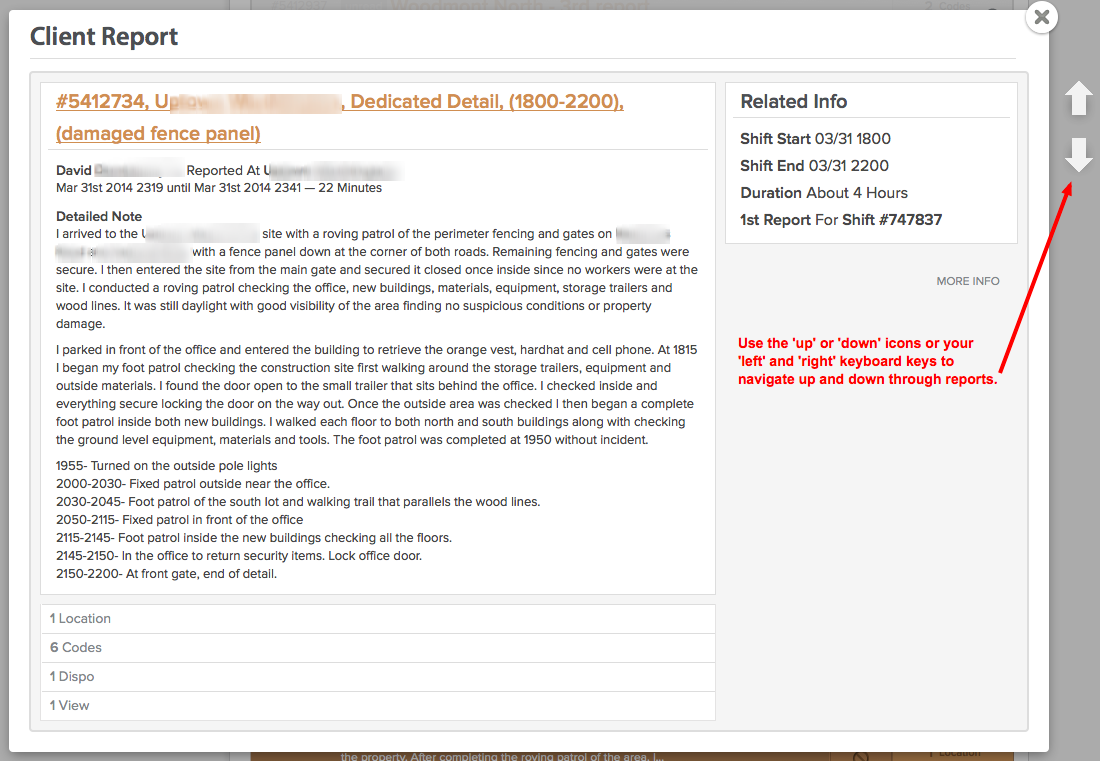
Report Detail Screen Example (permalink - meaning you can email other officers and/or managers a link to this screen)
Bulk Actions
You have the ability to select one or many reports and send them to a printer or to a separate expanded detail page using Bulk Actions (as seen directly below).
Full Reports List Example
The edit report form will look virtually identical to the add report form. You will be able to edit your reports from your reports list as mentioned above.
You can edit reports that you've written for your current shift at any time you're working that shift. You cannot, however, edit reports for shifts after you've clocked out and completed them.
You can edit reports during your shift by going to the report detail page (see above example) and clicking/tapping the EDIT button. Alternatively, you can edit eligible shifts directly from your reports list. While hovering over the report in the list, or after selecting the report, you'll see an edit 'wrench' icon. Click/tap the icon to begin editing your report.

Application Support Tab
Click/tap the SUPPORT tab on the right of the screen to get support using the Inteliguide application. This feature is not for asking security or management related questions. It is for getting help using the web or mobile applications. The tab will retain a fixed position as you scroll down any screen. The corresponding dialog will allow you to search through available documentation as well as log a new ticket if necessary.
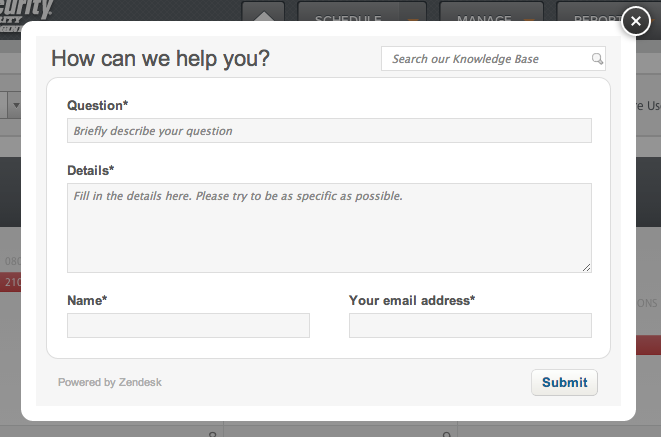
If, for some reason, the dialog isn't working for you. You can navigate your browser to https://lyconic.zendesk.com and access our full support website. Browse available posts, or submit a support ticket from our support website.
If you do decide to log a ticket, please be as thorough as you can be in explaining the details of the issue you're logging the ticket for. Describe in detail what your question/issue is about, and what events might have prompted you to submit a support ticket.
0 Comments